We have all felt the frustration of editing an image either in Lightroom or Adobe Camera Raw (ACR), only to remember that we forgot to adjust the white balance, or tweak the sharpening after we’ve spent hours of editing the image in Photoshop. If this has happened to you, let me introduce to you to something called a Smart Object.
Smart Objects give you greater flexibility in your editing workflow inside Photoshop. You can create a Smart Object when opening your image from Lightroom or ACR into Photoshop, and you can also create Smart Objects later on in your editing process, which can be very helpful – especially when you are applying a sharpening (or other) filter.
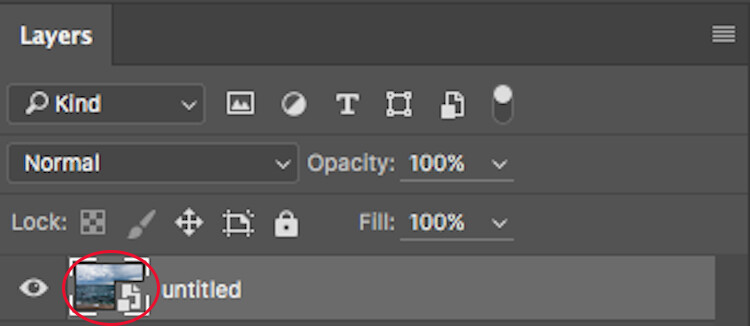
The icon over the preview of the layer indicates that this is a Smart Object.
So, what does a Smart Object do?
Smart Objects preserve an image’s source content with all its original characteristics, enabling you to perform nondestructive editing to the layer. When opening an image in Photoshop as a Smart Object, you have the ability to double-click the background layer (the base layer) which will open the image in ACR with all the adjustments you previously made, and enable you to make any alterations to the image. These alterations will then be pushed through to the image open in Photoshop.
So for example, say you adjusted an image in ACR and then opened it in Photoshop. After editing the image, you decide that the colour temperature is a little off. If you opened the image in Photoshop without it being a Smart Object, you would have to re-edit the image in Lightroom or ACR, then re-open the image in Photoshop, and finally, move any of the adjustments layers across to the new image. But if it were opened as a Smart Object, all you would need to do is double-click the background layer, make any of the desired adjustments in ACR and you’re done. The Smart Object will update in Photoshop and you can carry on.
Another way Smart Objects can help you is when applying a filter, such as Unsharp Masks or High Pass filters. By creating a Smart Object to apply these filters you will be able to double-click and adjust whichever filter has been applied.
How to Create a Smart Object
In Lightroom:
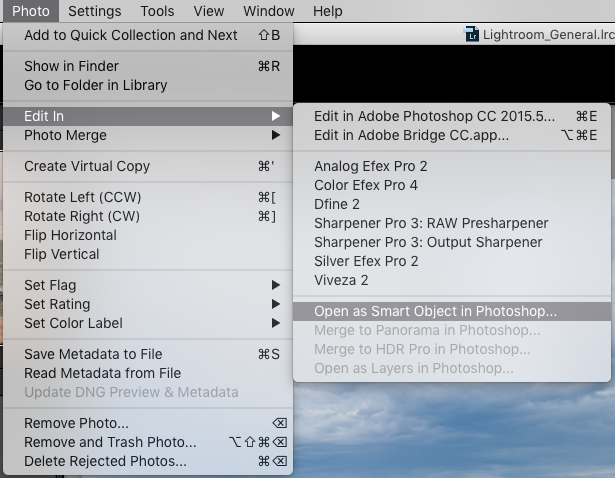
Inside Lightroom (with your image selected) go to the top menu and click: Photo > Edit In > Open as Smart Object in Photoshop… (see below)
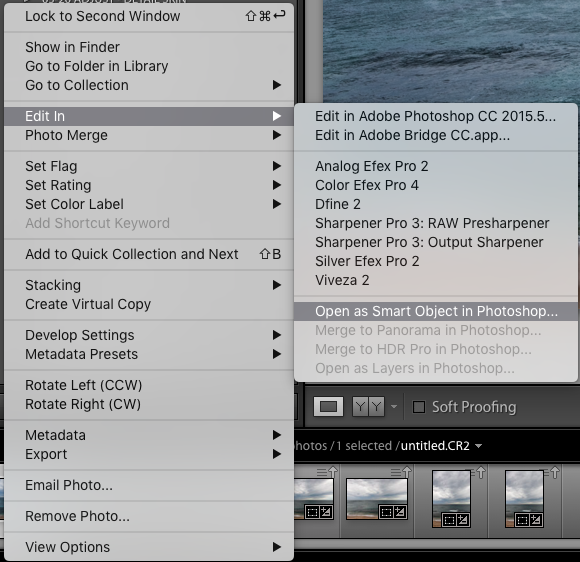
OR Right click on the image you want to open in Photoshop. Then select Edit In > Open as Smart Object in Photoshop…
Through Adobe Camera Raw:
At the bottom of the ACR window you will see something like this:

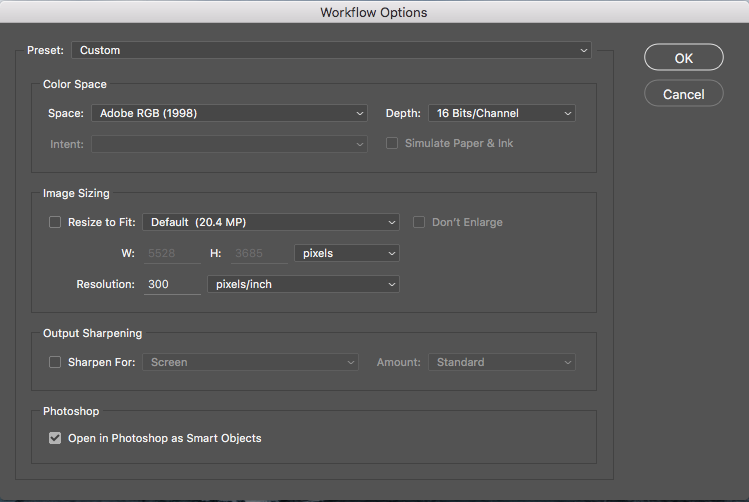
Clicking on this will open this dialog box. Make sure you have the Open in Photoshop as Smart Objects box checked. If you do not wish to do this (it is set as a default), you can also hold down the Shift key and the Open Image button will change to Open Object at the bottom right of the screen.
These are the two methods for creating a Smart Object before being opened in Photoshop. But what if you want to create one after you have already made adjustments? To do this, follow these steps:
Step 1: You need to create a new layer with all the adjustment layers combined (stamped) into that one layer – but you don’t want to flatten the image. To do this, select the top visible layer (visible layers are denoted by the eye icon directly next to them), hold down the Option/Alt key, and select Layer > Merge Visible. Or you can use the keyboard shortcut: Then do one of the following: Press Shift+Ctrl+Alt+E (Windows) or Shift+Command+Option+E (Mac).
Photoshop will create a new layer containing the merged layers. So you will now have a layer at the top of your Layers panel which has all the visible adjustments made below, stamped into it (the rest will remain untouched).
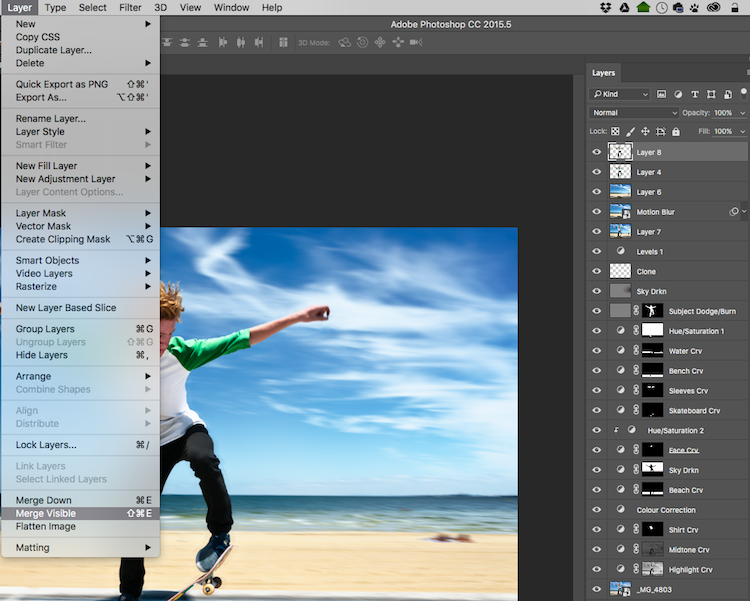
With the top visible layer selected, hold the Alt/Option key down, and select Layer > Merge Visible.
Step 2: With this new top layer selected, right-click and choose Convert to Smart Object. Now any adjustments you apply to this layer such as; motion blur, gaussian blur, any sharpening, etc., you will be able to alter again later by double-clicking on the Smart Object.
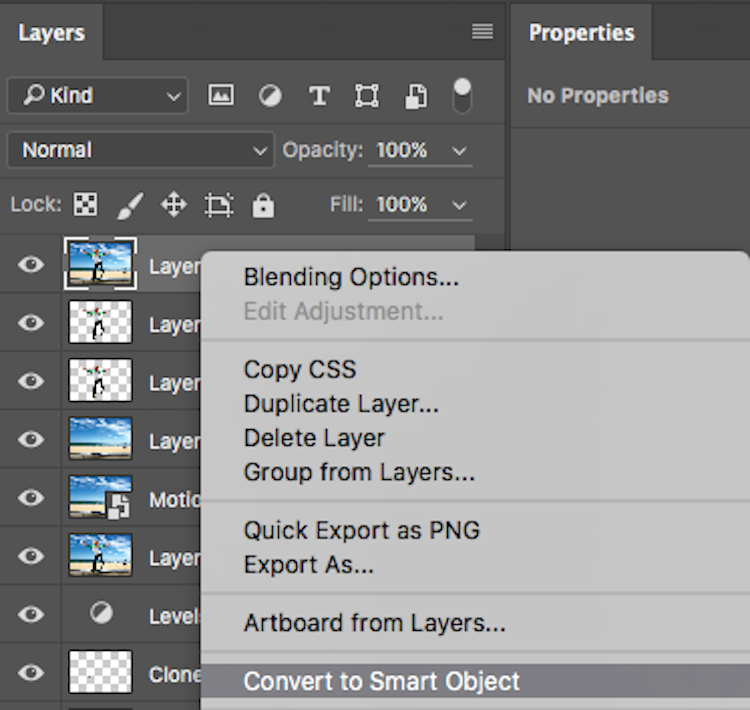
Creating Smart Objects is that simple, and the flexibility they give you is tremendous!
A couple of things to know about Smart Objects:
If you do not open the image in Photoshop as a Smart Object, creating a Smart Object in Photoshop will not give you the same editing abilities. If you want these editing abilities on your background layer, you must open it as a Smart Object.
Next, if you have made adjustment layers with masks applied to them, I would highly suggest that you do not crop the image through the Smart Object. This will crop the background image (your base image) and any masks that you have will not adjust to the new crop so you will have to go do your masking again. I would recommend doing any cropping before opening in Photoshop, or after you are finished in Photoshop.
Don’t be scared of Smart Objects. They are dead easy to make, and offer a massive amount of flexibility. Do you use Smart Objects? Have they helped you in your editing workflow? Let us know in the comments below.
The post How to Use Smart Objects in Photoshop by Daniel Smith appeared first on Digital Photography School.
from Digital Photography School http://digital-photography-school.com/how-to-use-smart-objects-in-photoshop/
No comments:
Post a Comment