One of the most confusing features of Adobe Lightroom for many users, is how to get your final results out of the software, to show them to friends or to send to customers. Different from other programs, there is only one way to “save” thing out of Lightroom – that is to an Export Images. This article will walk you through some of the options to help you demystify this often confusing function, so you can post your images on Facebook, and get them printed, all using the right sizes.
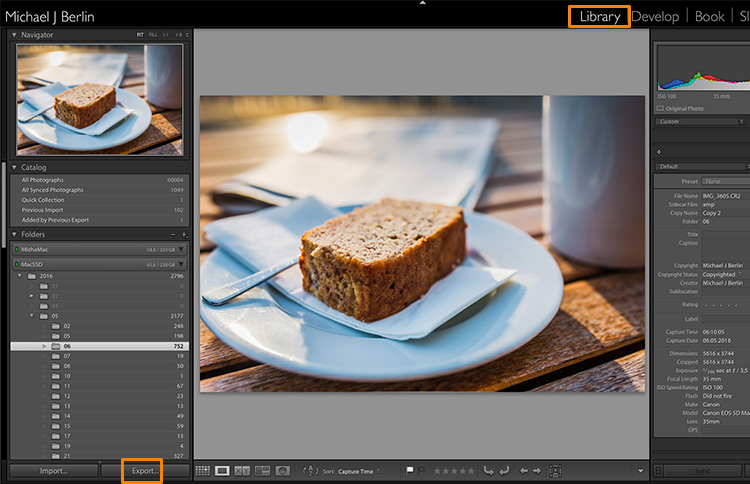
The reason is that Lightroom does not actually store your images, they are not really within its database. Lightroom merely keeps a list of locations where your original images are located, generates its own internal previews of those images to work with, and stores the changes you have chosen to make to the files. But until this stage all you are seeing in Lightroom is purely a visualization, there is no actual finished images created yet.
For this, you will have to learn to use the Export feature. While it is one of the essential features of Lightroom, it seems to confuse many people at the start. Part of the confusion certainly comes from the huge amount of options Lightroom offers when trying to save images:
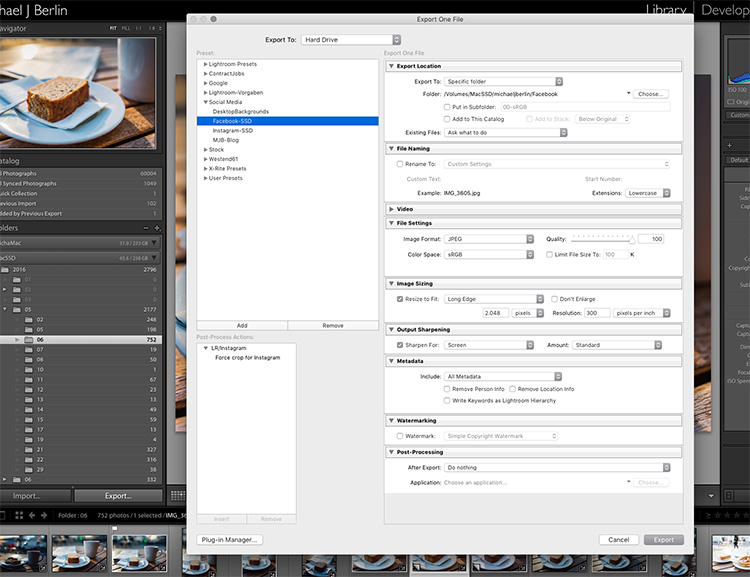
So let’s have a look at the most common cases for using the Export functionality to get the best results:
Export an image for Facebook
There are many discussions about how an image should be saved for Facebook. I trust Facebook’s own recommendations most and have had good experiences relying on that article. Typically I export images at the highest resolution Facebook will accept, the 2048 pixels mentioned in the help article.
So, first of all, you have to tell Lightroom where we want to save your image. Lightroom offers a lot of choices, one of them being to save the new resulting image into the same folder as the original. Remember, until now only the original image exists somewhere on your hard drive, no changes have been made to it.
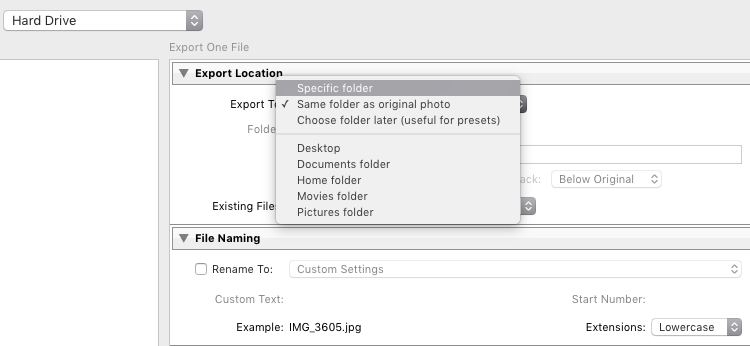
It can be a good idea to keep the original and your final copies in the same space. However, I typically save images into a subfolder to the original – named “For Facebook” for example – so when my original RAW image is in a folder structure by date “2016/05/06”, I would save my Facebook images into the sub folder “2016/05/06/For Facebook”.

Another option at this point that I regularly use, is to define a “Specific folder” for my outputs. This allows you to send all exported images to the same location on your hard drive, for example to keep a specific folder containing all the images you have uploaded to Facebook. This also works great to automatically save files into an online cloud storage such as into a Dropbox folder on your disk.
File format
Further down on the Export screen, you get to choose the file format you want to make the exported image. For internet purposes, you would mostly choose JPEG as the desired file format. JPG is a compressed format which allows faster transmission of images, so most internet based platforms use this format to store photos. PSD and TIFF will allow you to store images in full detail in with a wider range of colors (16 bit instead of 8 bit). Some printers (photo labs) will accept TIF files because of the additional details stored in the images, but you should make sure your printer does before trying to send files that can reach more than 100 MB.
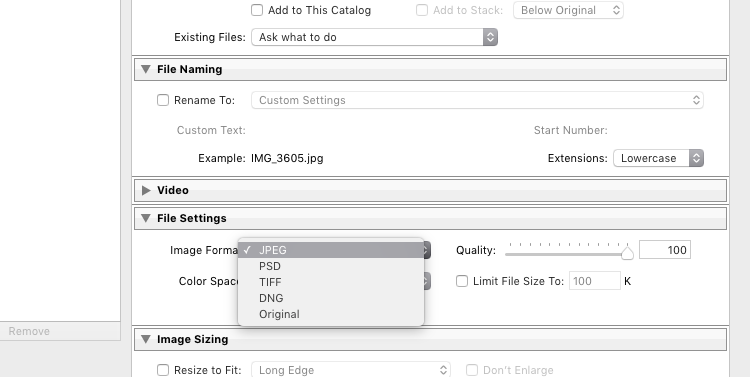
With the JPEG format, you also have to choose the Quality level. As JPEG tries to find areas of similar colors to make the file size smaller, the quality setting defines how “different” a color section needs to be before a compression is being applied. The lower the quality, the more compression artifacts you might see in the final image, in exchange for a lower file size. In most cases, values around 80-90% will not show critical changes over the full 100%, and only in rare occasions (when file size is very critical) you should go below 60%.
Color profile
Besides the format and quality settings, there is another drop down box in this section showing the color profile to be used. In simple terms, the color profile defines how many (and which) colors can be accurately stored. The smaller a color profile is, the less color information it contains, but also the smaller the file sizes will also be.
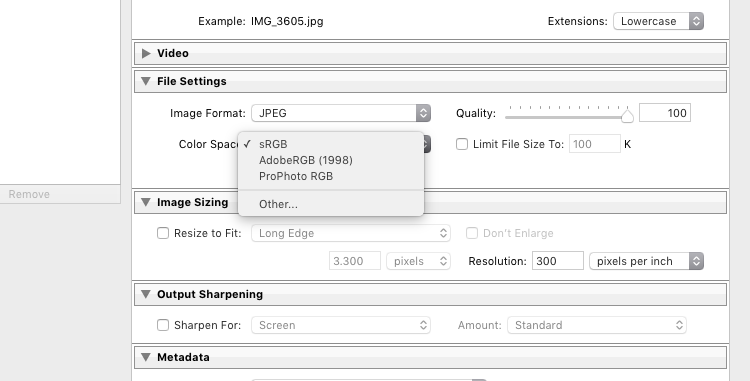
In general, sRGB is the best choice for all images that are meant to be displayed on electronic screens, from large computer monitors, to smart phones, on your website, or on Facebook. The other options (AdobeRGB and ProPhoto RGB) both contain more color information, which can be advantageous if you want to apply further changes to the images at a later stage, for example in Photoshop or in the pre-print processing.
Just as with generating TIF or PSD files, you should only use these other color spaces when sending images when you know in advance that the recipient at the target location can work with them. Most online print services today are prepared to accept images in JPEG format and sRGB color space, as this is what most consumers produce with their cameras.
Sizing your images
The final section you need to address before exporting your images are the resizing options:
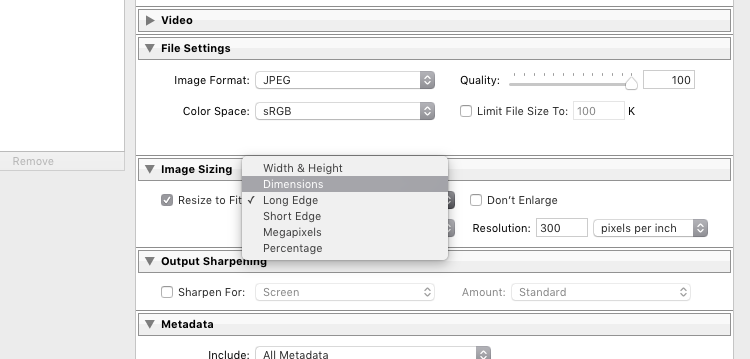
For images you plan to upload to the internet – be it your blog, to Facebook, or Instagram – you probably don’t want to upload the full resolution of 16 or 24 megapixels that your camera probably shoots. As mentioned in the linked help article above, Facebook only accepts up to 2048 pixels on the wide side, and if you upload larger images they will automatically be downscaled. So it is preferable to save the file in the recommended size, to save upload time.
With these settings, you could now export your image for sharing on Facebook. There are a few sections below like Output Sharpening (you can choose “Screen” and “Standard”, and compare the results to a version without output sharpening to see the difference) or adding a Watermark to your images automatically, but those are topics for a another article in the future. But just wait a second before you press the Export button right now, there is something else we should look at first.
Save your settings as an Export Preset in Lightroom
Now that you have taken the time to understand the settings on the Export screen and have come to a result you’re happy with, you want to be able to use the same settings in the future without having to think about getting them all right for every new image. This is why Lightroom allows you to save these settings as an Export Preset. Just press the “Add” button below the list of saved presets on the left half of the window, to add your personal preset – you can even have them sorted in Folders for different purposes:
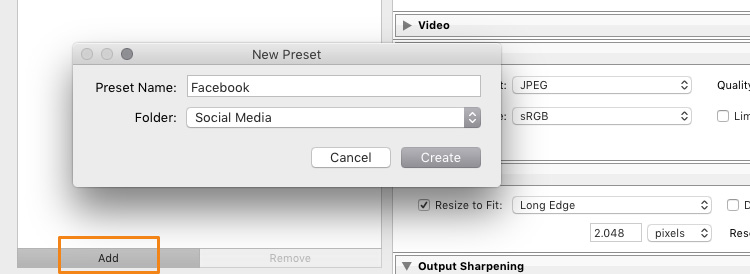
Once it is saved as an Export Preset, selecting the same settings is simply a matter of a single click. As you can see from the next screenshot, I have defined my personal Export Presets for different social media uses like my blog, Facebook, and Instagram, as well as usage as a new Desktop Background for my own computer.

Cropping images for desired format before the Export
With all the settings, we have looked at in the first part of this article, there is one important part that has to be done before entering the Export screen: Cropping your images when you want to use them into a format (proportion) that does not match your camera’s output.
Most modern cameras produce images in a 3:2 aspect ratio, so the long side of an image is 50 percent longer than the short side – in a 24 megapixel camera this translate to 6,000 x 4,000 pixels. However, traditionally there are different popular formats, especially when it comes to printing images:
- From the age of large format cameras, the 5:4 format (or 8×10 prints) is still very popular in some regions.
- Medium format cameras usually produced images in 6 x 4.5 (so a 4:3 ratio) or in 6×6 square format.
- The square format has also been Instagram’s unique format until recently.
- TV screens, and a growing number of computer monitors, come in the 16:9 standard defined by high definition TV.
To print a full image in one of those different formats would cause distortion, as the image information would have to be squeezed to fit to the shorter sides. In general, printers will not distort the image but instead cut them off at the side. To avoid a random crop in print, what you need to do is to crop your images to fit the desired output format.
Make Virtual Copies
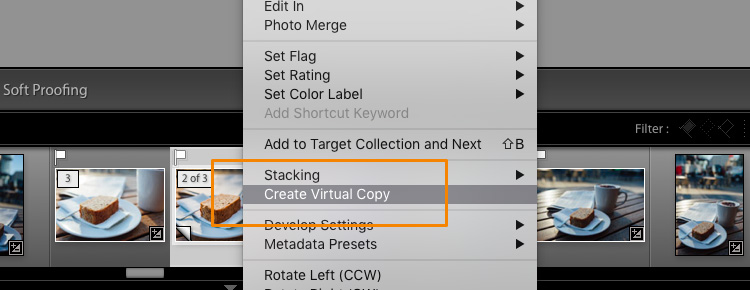
Bonus Tip: If you want to keep the original format for easy access and/or offer your customers different print formats, I recommend to create a Virtual Copy (keyboard shortcut is: Command/Control+’ or right click the image and select Create Virtual Copy, see screenshot below) from your image before doing the cropping. This way, you will have two (or more) versions of your images, one in original aspect ratio and others in the cropped format. Within Lightroom this will only take a minimal amount of space, as Virtual Copies do not duplicate the original file but are just an additional set of data within the database.
When you select the Crop tool in Lightroom’s Develop module, you will find a list of presets covering the most popular aspect ratios in a dropdown menu. Choose the desired format from the list, or choose a Custom Format if you don’t find the aspect ratio you are targeting.
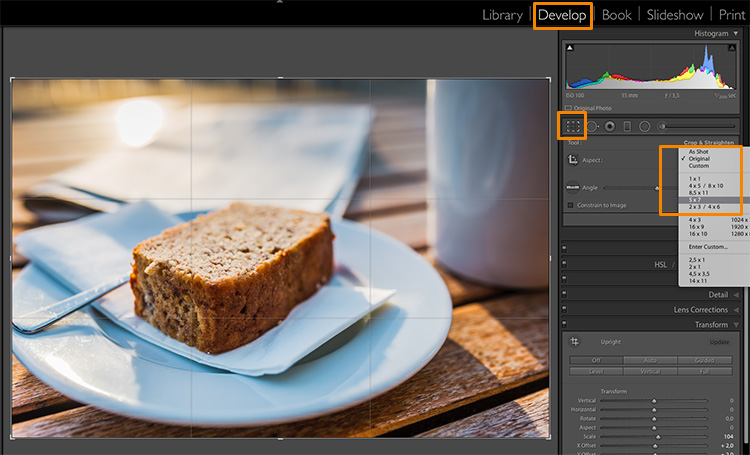
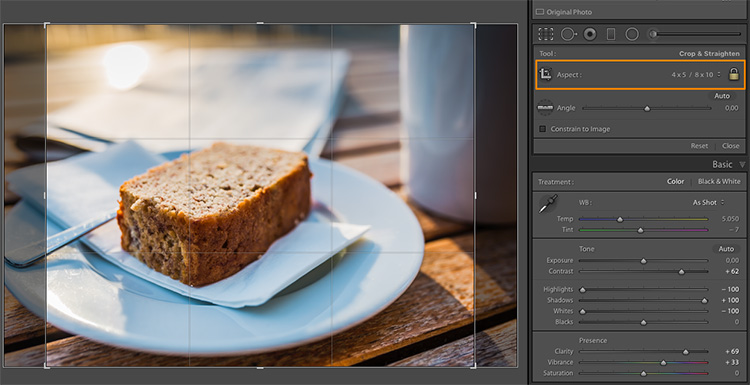
If you select a 5×4 crop, you will see the crop guides highlighting the parts of your image that will remain in the final result, and the darkened parts on both sides of the photo that would be cropped off. You can now move the crop area to your liking to the right or left – or drag one of the corners in case you want to close in to your main subject a little more. Reminder: As everything in Lightroom, this is a non-destructive process, you can change the chosen crop at any stage and even return to the original size.
To give you an idea how the different crops can impact an image, I have created five virtaul copies, in addition to my original 3:2 format image, and have applied the five most popular aspect ratios as follows:
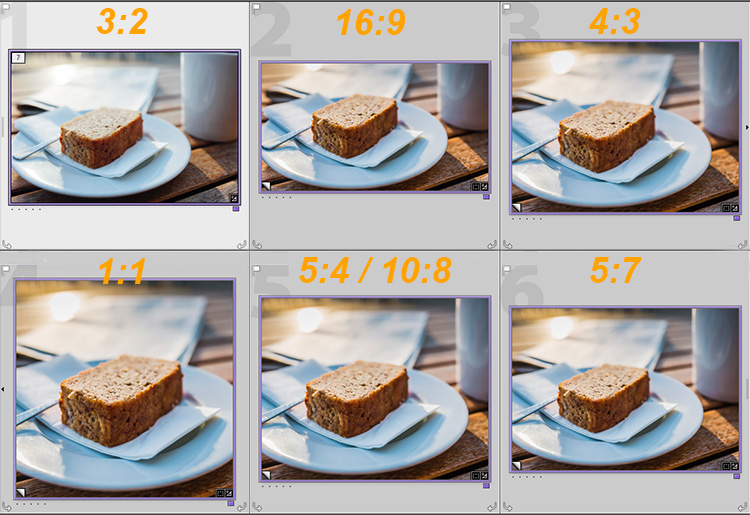
Image size settings
Once you are happy with your crop, you can go back to the Export screen from the Library module. Now let’s have a look at the Image Sizing section again. As you can see, I have now chosen to make Lightroom fit the image to a 8 x 10 inch print format. Please note that I have changed the measure from “pixels” to “in” in the drop down box for this – if you prefer the metric system, there is a “cm” option for centimetres as well.
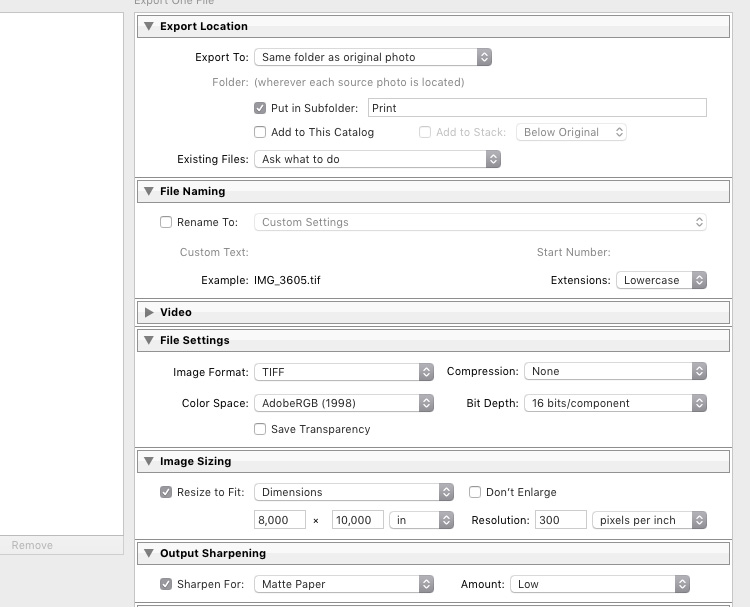
I have also set the Resolution to 300 pixels per inch which is the typical requirement for most printers. With these settings, Lightroom will now automatically save the image to the desired aspect ratio and file size. Remember to store these settings as another Export Preset if you are happy with the results, so you can use the same settings for future exports.
Also, please note that I have changed the File Settings in this case to TIFF, and AdobeRGB with 16-bit, to show the settings that will save the most information with the file. As discussed in the first part, this is only recommended if you know that the printer can handle the resulting large file size. If you want to deliver printable files to your clients, I would recommend you stick with JPEG and sRGB, as you can’t say in advance which printers they will use and most services will be able to handle those images as well.
Summary
I hope this article helped you to understand the basics of exporting images to different formats from Lightroom. In case you have questions, feel free to leave a comment below this article or join the Digital Photography School group on Facebook where I am available to answer questions as well.
For more training using Lightroom check out our new course Lightroom Mastery!
The post How to Size and Export Images from Lightroom for Facebook and Print by Michael Zwahlen appeared first on Digital Photography School.
from Digital Photography School http://digital-photography-school.com/how-to-size-and-export-images-from-lightroom-for-facebook-and-print/
No comments:
Post a Comment