Wednesday, 1 March 2017

Pixar Teaches You How Cameras Work in This Free Online Class

Kahn Academy recently teamed up with the team at Pixar to create a free online course for people who are interested in seeing how Pixar artists “do their jobs.” But lest you think there’s nothing there for photographers, think again. One of the classes in this course will definitely appeal to still shooters.

The class is called “Virtual Cameras,” and it covers a whole range of topics relating to cameras and optics. When Pixar is animating a movie like Inside Out, the Director of Photography treats the process as if he or she were shooting a real life scene. Focal length, camera angle, depth of field, and more are all considered, and the Pixar team explains how and why in their Virtual Cameras class.

Here’s a quick intro from the class, where they discuss basic concepts in photography and optics and show you how those same concepts apply to the virtual camera used to ‘film’ Pixar movies:

The course begins with pinhole cameras, then moves on to cover: focal distance and its effects, camera lenses, depth of field, storytelling with a camera, and scene composition. Each of these subjects are elaborated and expanded on in turn, explaining concepts like the Simple Lens Law and Thin Lens Approximation.

The class is one of the more fun ways to learn all about cameras and optics—or maybe get your kids into it?—and it’s available 100% for free on the Kahn Academy website. Check it out, and if you like this class, give the whole course a try. Not every class is as relevant to photographers, but we have a feeling classes like Color Science and The Art of Storytelling won’t be a waste of your time.

Click here for the full course, or here to try out the Virtual Cameras class.

(via Photofocus)


from PetaPixel https://petapixel.com/2017/03/01/pixar-teaches-cameras-work-free-online-class/

Google Just Patented a Weird Camera Hat

Well this is… interesting. It doesn’t seem like the very public failure of Google Glass—due, in large part, to the built-in camera—has deterred Google from pursuing wearable camera tech. A recent patent shows that they’re at least considering putting a camera and microphone onto a baseball cap.

The headline-making Google patent was granted last week, and describes a baseball cap with a camera system embedded in the center of the bill. This particular invention, however, is being billed (see what I did there…) as more technically than creatively useful.

“In one aspect, a hat and a camera system for the hat can be used for an interactive session with a remote user,” writes Google by way of summary. “In another aspect, the hat and camera system for the hat can be used to interact with an emergency situation routing system.”

You can dive into the technical details here if you’re curious, but it sounds like a wireless-capable device primarily used to capture (and possibly stream) first person view video, attaching information like GPS location in case you need to use it to hail emergency services. It will also include a bone-conducting speaker and built-in microphone, making it possible to use the camera hat in conjunction with your phone.

And you thought Google Glass was a bit much…

(via Mashable)


from PetaPixel https://petapixel.com/2017/03/01/google-just-patented-weird-camera-hat/

This Photo Has No Red Pixels: A Fascinating Optical Illusion

I initially refused to believe it when this photo came across my feed. My eyes aren’t broken! I can see they’re strawberries, and they’re definitely red. They have to be trolling us with this image, right?

I immediately took it into Photoshop and used my color picker because I just had to prove myself that my eyes aren’t deceiving me. I made sure my point sample was set to point sample (the individual pixel). You can’t see my cursor on the print screen but I picked the deepest red I could find.

Uhhh… they all came out gray. That just makes me a little angry! It’s putting my brain in for a complete spin. Try it out for yourself, take it into Photoshop and use your color picker. So what’s exactly happening? Here’s the reasoning below.

The photo was created by Akiyoshi Kitaoka, a Professor of Psychology at Ritsumeikan University in Japan.

While this time everybody is seeing the same thing, the optical illusion is created through a similar phenomenon that caused so much turmoil with The Dress. It’s called color constancy. It’s your brain’s way of color correcting the world when it’s filtered through different light.

When you look around the world, the light that enters your eye is made of different wavelengths that come from both the pigments of the objects around you and the light that illuminates them.
Source

Thank you to Fizzah Raza for the find!

(via Retouchist)


About the author: Pratik Naik is a photo retoucher specializing in commercial and editorial work. To see his work, head over to his website or give him a follow on Instagram and Facebook.


from PetaPixel https://petapixel.com/2017/03/01/photo-no-red-pixels-fascinating-optical-illusion/

Turn a Cheap Vintage Lens into a DIY Selective Focus Lens for $10

Lensbaby’s creative selective focus lenses like the Composer Pro will run you around $400; even the relatively affordable Spark costs $90. If all of that sounds too expensive for your taste, you should definitely check out this hacked version Mathieu Stern created for just 30 bucks!

Stern’s penchant for weird lenses and optical experimentation led to him to discover a neat rubber freelensing adaptor that costs just $10 and turns his beautiful old Helios lenses into creative focusing Lensbaby look-alikes at a fraction of the cost.

He created this shot using a $20 Helios 103 53mm f/1.8 lens he got off eBay, and the $10 rubber adaptor:

And this one was shot with a $20 Helios 44-2 58mm f/2 and the same adaptor. Thanks to the 44-2’s distinctive swirly bokeh, the shot turned out even more dramatic:

Check out the video up top for more sample shots and an explanation of how to use this simple adapter. And if you want to see more from Mathieu, check out his blog, visit him on Facebook and Instagram, and subscribe to his channel on YouTube.


from PetaPixel https://petapixel.com/2017/03/01/turn-cheap-vintage-lens-diy-selective-focus-lens-10/

11 Tips to Master Autofocus and Increase Your Hit Rate

How the Tone Curve REALLY Works, and 6 Ways Adobe Could Improve It

The tone curve is one of the most powerful tools in photo editing, allowing you to change multiple values and essentially doing the job of several different adjustment layers. But it’s also complicated, and hard for beginners to understand. These two videos should help.

The first video was shared by Photoshop Tutorials back in December, and it explains how tone curves REALLY work. From adjusting the main RGB curve to breaking down the curve into its Red, Green, and Blue components, the video explains the tone curve, offers some tips on learning how to use it, and shares plenty of examples of different curves in action.

That video alone is worth your time, especially if you still find the tone curve confusing. This next video add to it by suggesting a few design changes Adobe could do to make that would greatly improve the tool.

The video was shared two days ago by Denny Tang, and it attacks the tone curve from a different angle than most tutorials. This is an advice video for Adobe that shows what a major Curves redesign could look like in Lightroom and Photoshop to make the tool much easier to learn and use.

He lists 5 different changes, each of which will help you to better understand how the tone curve works. But even if Adobe pays no attention to Denny’s suggestions, the video will still leave you with a more comprehensive understanding of this powerful photo editing tool.


from PetaPixel https://petapixel.com/2017/03/01/tone-curve-really-works-6-ways-adobe-improve/

Hands On with The New Godox AD200 Pocket Flash

In late 2015, I stumbled upon a strobe called the Godox TT685: a fully-featured speedlight that has radio master and transmitter capabilities built right in. Being a Nikon user, I had never experienced that type of wireless connectivity, and I bought 3 despite being leery of the price.

Since then, Godox has made one impressive release after another, creating a robust lineup of flashes all working as a system. While their previous strobes are of familiar styles, their newest release shows they are not done innovating.

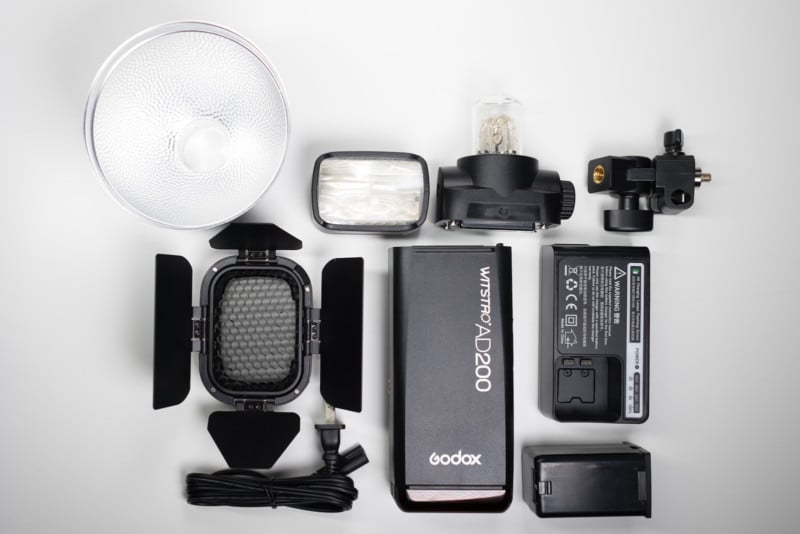
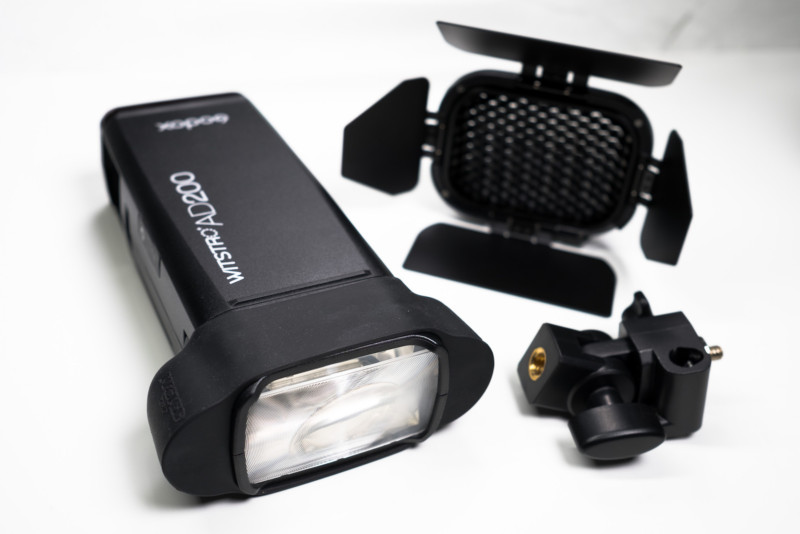
Because of my YouTube reviews and articles, Godox sent me a tester model of the new Godox Witstro AD200. Like many of their other products, it has TTL, HSS, and a built-in 2.4Ghz receiver to drop right into the rest of the Godox X Series. The lithium-ion battery is built right in, and despite boasting 200w/s, it keeps a very small form factor. Lastly, it has an interchangeable head, allowing it to switch from an omnidirectional bulb (like you would find on a monolight) or a 35mm fresnel head (like you would find on a speedlight).

This information is out on the light, so I want to focus more on specifics and how it performs.

Size and Weight

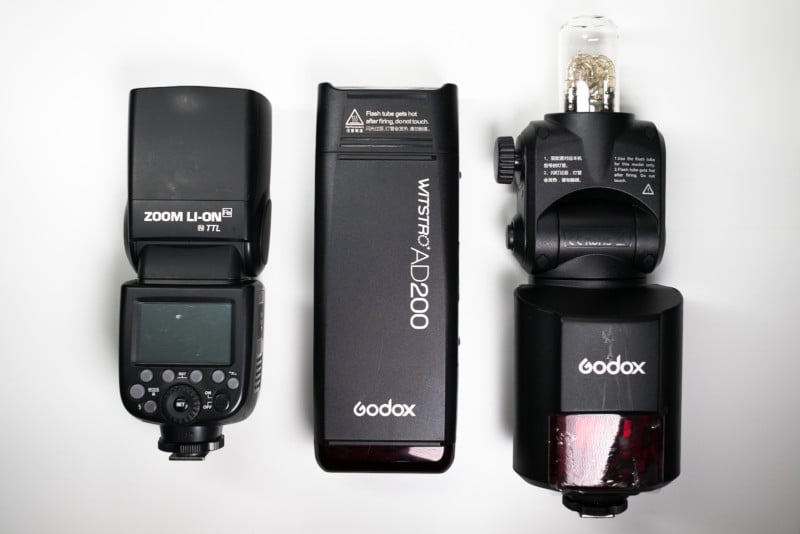
The AD200 is a bit longer than the typical speedlight, moreso with the omnidirectional head attached. It fits almost the same in the hand though. In terms of weight, it’s a bit bulkier than the speedlight as well.

  • V860II (with battery) – 1.2 lbs
  • AD200 (with battery) – 2 lbs
  • AD360II (body only) – 1.9 lbs
  • AD360II (body + cable + PB960) – 3.5 lbs

Power

I positioned a stand and metered the light at full power against the products that it falls in between. Here were the results:

  • Godox V860II-N @ 35mm: F/10.9
  • Godox AD200 w/ 35mm Fresnel Head: F/16.4
  • Godox AD200 w/ omni head + 5” reflector: F/16.4
  • Godox AD360II-N w/ 5” reflector: F/22.2

With the same style head, the AD200 metered in at 1.5 stops more powerful than the V860II-N. This means the output of the AD200 is the same as having 3 V860II-N speedlights (which are the same output as most flagship speedlights on the market).

And when flipped to the omnidirectional head, it came in .8 stops less powerful than the AD360II-N. When you consider the size of the AD200, it’s impressive that it produces that much power. If you are a speedlight only user, this light could significantly help you balance exposures and gain flexibility of position in bright outdoor conditions.

Recycle Speed

I’ll be honest, I laughed when I first saw the specs of this flash and they listed a 2 second recycle time. I just didn’t see how it was possible given the V860II has a 2 second recycle speed at full power, and that’s a far less powerful flash.

When I first pulled the AD200 out of its box, the battery was on its last bar. I put it up to 1/1 power, and boom, it recycled in 2 seconds. I continued this until I killed the battery, and the speed never slowed down.

After fully recharging the battery, I did a quick stress test. I fired it 45 times in a row and there was never any indication of heat protection kicking in, nor did it slow down. At ¼ power and below, the AD200 recycles almost instantly. The battery has enough capacity for over 500 full power flashes.

LED Light

The fresnel head has 2 LED strips in it that can be activated from the controls on the back. These lights have one power setting and are not significantly bright, so don’t expect to be using it as a modeling lamp.

Flash Duration

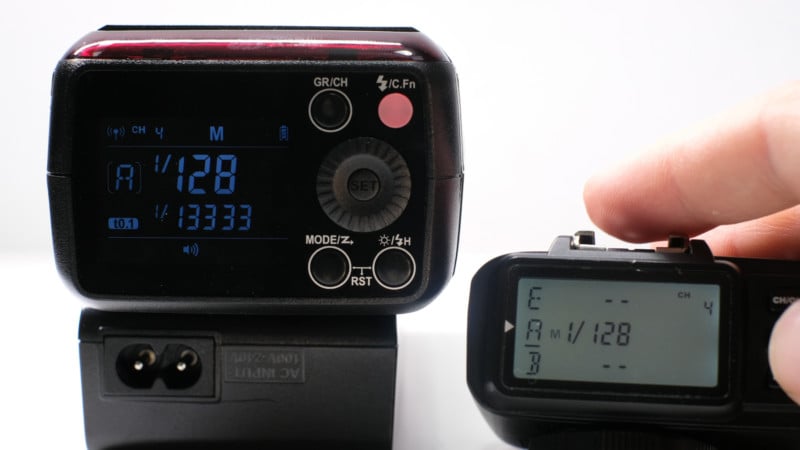
I was quite pleased to see that Godox continued their trend of listing the t.1 flash durations for each power output right on the display of the flash. I was also impressed to see that it is capable of reaching 1/13000 second at the lowest power setting, and is still close to 1/2000s at 1/4 power. This light will be highly capable of freezing fast motion.

Here’s the flash duration you can expect at the full stop increments.

  • 1/128 – 1/13333s
  • 1/64 – 1/10204s
  • 1/32 – 1/7518
  • 1/16 – 1/5128
  • 1/8 – 1/3225
  • 1/4 – 1/1818
  • 1/2 – 1/869
  • 1/1 – 1/220

Controls

From the back of the light, you can control the Godox AD200’s mode (ttl/multi/regular), HSS, LED, 5 groups, 32 channels, power, and access the custom functions. However, the beauty of this system is that you should rarely have to touch anything on the flash itself, aside from turning it on. The AD200 can be fired and controlled by the X1 controller, XT32 (currently for Canon only) controller, all 4 X-series speedlights, as well as the AD360II. All of these units will tell the AD200 to enter HSS automatically when you exceed the flash sync speed on your camera.

It’s worth noting here, that there is only going to be one version of the AD200, which will accept the control/TTL/HSS signals from Nikon, Canon, and Sony camera bodies using the appropriate controller.

“Modular”

The AD200 is being listed online as a modular flash. While it does have ridges on one side and gaps on the other (to allow multiple AD200’s to stack onto one another), there is no type of mechanism to actually connect two of these flashes together. It would seem simple enough, given the multiple ¼” 20 threads on the body, to create a mount that will attach multiple AD200’s onto a single stand. I’m still waiting to hear back from Godox to see if they have plans to release such a mount.

Compatibility

There were a lot of question marks when it comes to how this new body style will work with the tools we photographers are already using. So, let me clear up what you can expect this to work with.

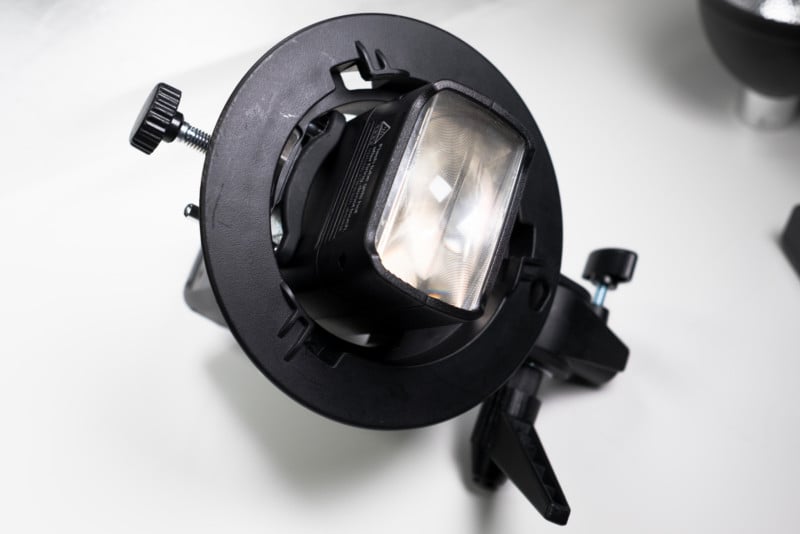
First, the Bowens S-Mount Adapter. Many people have started using this adapter to put their speedlights (or AD360II) in, and be able to attach umbrellas or Bowens S-Mount modifiers. The AD200 can just BARELY squeeze into that adapter. When I say barely, I mean you have to open the S Mount as far as it can go, and wiggle the AD200 back and forth until its ridges get over the bottom (this goes for both heads).

Once it’s in, it’s a very sturdy hold, but I would expect some may prefer a more proper fitting adapter. Hopefully Godox releases a new one designed to accommodate the AD200.

The Fresnel head will accept typical speedlight modifiers such as the MagGrip from MagMod, Rogue flashbenders, gels, and pretty much anything that is universally designed for speedlights. Godox is also releasing a proprietary Barn door/honeycomb/gel holder for the fresnel head. The omnidirectional head will accept all the same modifiers specifically designed for the AD360II as well.

The one place where I see a compatibility issue is rear-mount speedlight softboxes such as the Wescott Rapid box. Because the AD200 does not bend, nor does it have a shoe, it won’t be a great fit with those style modifiers.

Conclusion

The AD200 is everything they promised on the rumor spec sheet—it’s small, fast, powerful, reliable and well-designed. One comparison I found is that this is very similar to the power you would get from an Alien Bee AB400, Vagabond, and radio gear, except it fits in one hand. For me, this is going to clear up my bag quite a bit.

Given that it falls right in between the speedlights and monolights, I’ll be getting leaving a few of each at home and filling the bag with a couple AD200’s instead.


About the author: Robert Hall is a wedding, portrait, and commercial photographer based in Michigan. You can find more of his work on his website, Twitter, Facebook, YouTube, and Instagram.


from PetaPixel https://petapixel.com/2017/03/01/hands-new-godox-ad200-pocket-flash/