Thursday 31 May 2018

Camera+ 2 is a Next-Gen RAW Camera App for the iPhone and iPad

The popular third-party iPhone camera app Camera+ is getting replaced. Camera+ 2 is a new version for the iPhone and iPad that has been completely revamped to provide a top-notch photography experience for iOS photographers.

“A lot of things have happened in the 8 years since we first released the original Camera+,” the developers write. “iPhone cameras have improved dramatically – not only in terms of sheer optical quality, but also in the array of technical and creative tools they provide. Manual controls, RAW capture, depth editing are a few of the capabilities whose presence in a mobile phone was unthinkable just a couple of years ago.

“We decided it was time to rebuild Camera+ to prepare for the next 10 years of mobile photography. We rewrote everything from scratch to create a solid and modern foundation on which to incorporate the advances we’ll see coming with every new iPhone release.”

Camera+ 2 provides a consistent experience whether you’re using a phone or tablet (there’s multitasking support for the iPad).

And while the original Camera+ reserved powerful features for customers who were willing to shell out extra money through in-app purchases, all the features of Camera+ 2 are available to all users.

In addition to a minimal interface for casual photographers, there’s also RAW capture and powerful manual controls that allow adjustments of things like shutter speed, white balance, macro, and ISO.

Focal length (wide vs telephoto) can also be chosen if you’re using a dual camera iPhone. When depth capture is turned on, depth data is stored in photos and can be utilized for depth-specific editing afterward.

Camera+ 2 is also a much more powerful RAW photo editor, as you can quickly switch between Lightbox mode and viewing your entire collection of images in the Photo Library.

Other features include adjustable-strength filters, Smile mode (smile detection shooting), Stabilizer mode (steadiness-detection shooting), Slow Shutter mode (long exposures), Burst mode, Timer mode, Files/iTunes integration (for transferring photos), and iOS gestures.

The original Camera+ app was released in 2010 and rapidly sold over 14 million copies, becoming one of the most popular paid apps of all time for the iPhone.

Camera+ 2 is now available for purchase from the iTunes App Store for $3. The original Camera+ app currently costs $2.

(via Mac Rumors via DPReview)


from PetaPixel https://petapixel.com/2018/05/31/camera-2-is-a-next-gen-raw-camera-app-for-the-iphone-and-ipad/

TIME’s Latest Cover Photo is a Drone Photo of 958 Drones

TIME magazine’s latest issue is a special report on the rapid explosion of drones in our culture. For the cover photo, TIME recreated its iconic logo and red border using 958 illuminated drones hovering in the sky. It’s the first-ever TIME cover captured with a camera drone.

To create the photo, TIME partnered with Intel’s Drone Light Show team (which creates beautiful sky displays using hundreds of drones at a time) and Astraeus Aerial Cinema Systems to fly and capture (respectively) the 958 drones above Folsom, California (where Intel has a campus).

The project was one of the biggest drone shows ever done in the United States — it’s a display measuring 100 meters (~328 feet) tall:

Here’s a 13-second video in which a camera drone flies through the cover in the air:

And here’s a 4.5-minute behind-the-scenes video showing how the one-of-a-kind photo shoot was done:

The display was actually filmed with a cinema camera on the Astraeus-flown drone, and the cover photo was a still frame extracted from the footage.

The cover can be found on the June 11, 2018, issue of TIME, which will hit stands on June 1st.


from PetaPixel https://petapixel.com/2018/05/31/times-latest-cover-photo-is-a-drone-photo-of-958-drones/

Yongnuo Unveils 50mm f/1.4 II Lens, Replacing Its Canon Clone

Working with Different Shutter Speeds for Landscape Photography

There are three fundamental settings in landscape photography: the ISO, Aperture and Shutter Speed (known as the Exposure Triangle). While all of these are equally important to understand in order to create technically correct images, there’s one that’s extra important when it comes to an image’s visual impact. Adjusting the shutter speed makes a big difference and is often what can make your image stand out from the crowd.

Choosing the ideal shutter speed is not an easy process though. There rarely is a single correct shutter speed but there certainly are scenarios that benefit from a specific one. In this article, we’ll look at a few different scenes and how the shutter speed affects each of them.

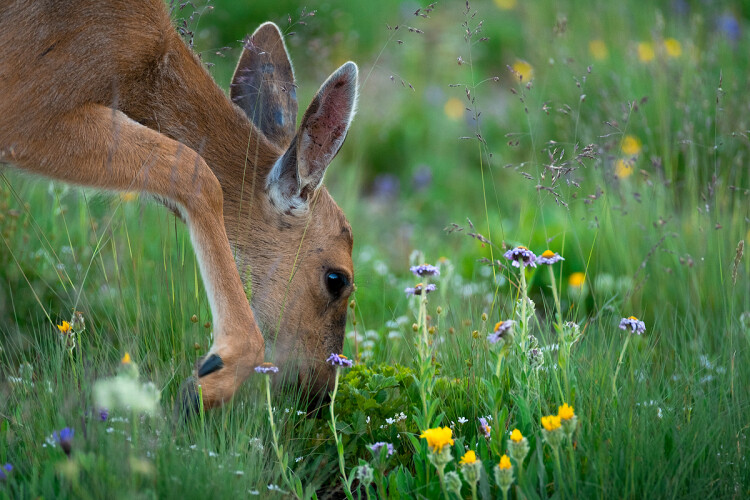
Working with Fast Shutter Speeds

The easiest shutter speed to work with is a fast one. Working with fast shutter speeds doesn’t require a tripod and you can easily photograph subjects that quickly pass by. This is also the most common choice for most beginning photographers as it doesn’t require much effort (and most auto functions choose a relatively fast shutter speed).

Below you have a typical example of when you need to use a fast shutter speed. In order to freeze the motion of the deer, I had to increase the shutter speed to 1/320th of a second. Had the deer been moving at a higher tempo I would have to increase the shutter speed even more to avoid any motion blur.

deer in a field - Working with Different Shutter Speeds for Landscape Photography

Photographing animals is not the only time where you should use a fast shutter speed though. In the image below, I used a shutter speed of 1/1600th.

Why did I use such a quick shutter speed for that scene? By the looks of it, the water is quite still, there are no moving subjects and there’s still enough light to use a slightly slower shutter speed, right? Yes, however, this shot was taken from a boat and even though the waters were relatively still, I needed a very quick shutter speed in order to freeze the scene without any blur from camera movement.

iceberg and water - Working with Different Shutter Speeds for Landscape Photography

Use the ideal settings not perfect ones

Had I been standing on land, I could have easily used a slower shutter speed and achieved a similar look. In fact, the overall quality could have been even better as I could have used a lower ISO and an ideal aperture. However, the purpose of photography isn’t to always have the perfect settings; it’s having the ideal settings that allows you to get the shot within the given conditions. The most important is to actually capture the image.

For too long I was too focused on always having the perfect settings. The truth is that this often leads to missing the shot as you focus too much on the technical aspect rather than working with the conditions you’re given.

For example, using a slower shutter speed when standing on a boat (such as in the image above) would have led to the icebergs being blurry due to the motion. What would you prefer? A blurry picture which is “technically” perfect, or a sharp picture that doesn’t have the technically perfect settings?

Before we move on to slower shutter speeds, let’s look at a few more scenarios where a fast shutter speed is recommended:

  • When photographing handheld.
  • Photographing quickly moving subjects.
  • When aiming to freeze motion.
  • When photographing from a vehicle.

Working with Slow Shutter Speeds

In landscape photography, the difference between slow shutter speeds is much bigger than between fast shutter speeds. While you won’t see a huge difference between 1/320th of a second and 1/640th of a second (in most cases) you may see a big difference between 10 seconds and 60 seconds. Because of this, I’ll split this section in two parts: less than 30 seconds, and more than 30 seconds (Bulb Mode).

dark image with moving water - Working with Different Shutter Speeds for Landscape Photography

The definition of a long exposure is somewhat vague but in my Ultimate Guide to Long Exposure Photography eBook, I describe is at the shutter speed where you no longer can capture a sharp handheld image. Typically, this is in the range of 1/50th of a second, depending on your camera and focal length (a longer focal length requires a quicker shutter speed to capture a sharp handheld image than a wide-angle).

Shutter speeds up to 30 seconds

While the difference between a 1 second and 30-second shutter speed is big, it’s more natural to put these together in one section to keep this easier to follow. Still, I’ll try to break it up a little to give you an idea of which shutter speeds you should experiment with in different situations. Again, there’s no correct choice and it often comes down to your preference and the tools you’ve got to work with.

When photographing beaches and seascapes where waves are crashing onto the shore or forming around rocks, I often work with a shutter speed of 0.5-1 second. I find that this creates a nice blur in the water while still keeping enough texture. A slower shutter speed such as 8 seconds blurs the water but not enough to give it the “silky” effect you often see with long exposure photography (we’ll come back to that in a bit).

waves crashing on a rocky shore - Working with Different Shutter Speeds for Landscape Photography

This also applies when photographing waterfalls and rivers. I tend to use a semi-slow shutter speed rather than an ultra-slow shutter speed when working with these scenes, as I prefer to keep some textures in the water.

As you lengthen the shutter speed you’ll see that moving elements become more and more blurry. In the image below, I used a shutter speed of 20 seconds to blur the water and give some motion to the sky. If you look at the clouds, you can see that they have been moving and it’s starting to have the “dragged sky” effect.

seascape scene - Working with Different Shutter Speeds for Landscape Photography

Keep in mind that the speed of the clouds determine how slow the shutter speed needs to be in order to pick up this motion. When clouds are moving quickly you can pick up their motion even with a shutter speed of 5-10 seconds, but to really get the “dragged sky” effect you often need to use a shutter speed (or exposure time) longer than 30 seconds.

Shutter speeds longer than 30 seconds (Bulb Mode)

In order to achieve a shutter speed longer than 30 seconds you most likely need to activate Bulb Mode.

When I first got into long exposure photography and purchased my first 10-Stop ND filters, I immediately got hooked on these ultra-slow shutter speeds. I’ll admit that I don’t do as much of it anymore (as it rarely fits with the vision I have for most locations) but it’s certainly a lot of fun to play with.

The main reason to use a shutter speed longer than 30 seconds for landscape photography is to achieve the “dragged sky” effect and to completely blur out moving elements such as water. It can also be a good way to remove people from your images (if they walk around during your 2-3 minute exposure they most likely “disappear”).

sunset on a coastal scene - Working with Different Shutter Speeds for Landscape Photography

For the image above I used a shutter speed of 180 seconds. As you can see, this has completely blurred the water and the sky is dragged across the frame.

Conclusion

Working with longer exposures can be a lot of fun but it’s not something that’s always beneficial. For example, when photographing a scene that doesn’t have any moving elements (and no clouds), there’s no need to use an ultra slow shutter speed, as it will most likely look exactly the same with a slower one.

So knowing how to select the best or most appropriate shutter speed takes practice, and comes down to what you want to achieve in your image.


For more information about this and other aspects of this type of photography, check out my Ultimate Guide to Long Exposure Photography eBook,

The post Working with Different Shutter Speeds for Landscape Photography appeared first on Digital Photography School.


from Digital Photography School https://digital-photography-school.com/working-different-shutter-speeds-landscape-photography/

Wednesday 30 May 2018

When Your Camera Battery Bursts Into Flames…

The FAA warns against storing spare lithium-ion batteries in checked baggage, and Norwegian photographer Vidar A. Bøen recently learned first hand why that is when one of the batteries used in his Nikon DSLR burst into flames.

Bøen purchased his Hähnel HLX-EL15HP battery and charger back on March 19th. Hähnel bills itself as one of the “leading manufacturers of power products” for digital cameras.

Once home, Bøen plugged the charger into a USB wall socket and began charging the battery for the first time. About an hour later, the battery suddenly burst into flames.

“Luckily, I was in the same room and after 30 seconds the unit was carried outside the house,” Bøen tells PetaPixel. “No major damage was made except for a lot
of smoke and some fragments to be cleaned.”

Here’s what the battery and charger looked like in the aftermath:

Bøen then brought the charred battery and charter back to his local store, which got in touch with Hähnel, which requested that he ship the burned equipment to its headquarters in Ireland for investigation. That was at the end of March.

This week, Hähnel’s findings were finally delivered to Bøen. The company concluded that the charger was definitely not the cause of the failure, placing the blame solely on the battery.

“The battery failure in this case is classified as a ‘field failure’, which because of best practice at all stages in the manufacturing process, are very rare, but also are not predictable and not detectable through quality control procedures,” Bøen tells PetaPixel. “New technologies and techniques are constantly being researched but these ‘field failure’ mechanisms are inherent in all lithium-ion batteries.”

Here’s the official conclusion from Hähnel’s investigation:

One cell in the HLX-EL15HP short circuited internally and went into thermal runaway. This is very rare, but inherent, failure mode in all lithium-ion batteries.

So basically, the camera is saying that every lithium-ion camera battery out there, including those manufactured by Nikon itself, could have failed in exactly the same way.

“We should be careful during the first charging process,” Bøen says. “The most important message when using new equipment related to charging is:
Do not leave it alone.”

Hähnel provided Bøen with a free Pro Cube 2 charger and two replacement batteries as a gesture of goodwill, but Bøen says that he also purchased a Nikon brand battery after the incident.


from PetaPixel https://petapixel.com/2018/05/30/when-your-camera-battery-bursts-into-flames/

How Bad is GDPR for Photographers?

This 1921 Cartoon About Photos is One of the First Memes

In 1921, the satirical magazine The Judge published this two-panel comic about how you look in photos. It’s strikingly similar to the “Expectation vs. Reality” memes that circulate the Web today, and the comic is one of the earliest recorded memes.

In the comic, we see comparison portraits of “How you think you look when a flashlight is taken” compared to “How you really look.”

We don’t use the word “flashlight” in this way nowadays, but in those days it was apparently a reference to shooting a still photo portrait using an old school flash lamp, which used explosions to produce bright artificial illumination.

After Yesterday’s Print first stumbled upon the comic, BBC News did some digging and found one earlier example of an “Expectations vs. Reality” meme comic published a year or two earlier.

So this comic may not be the first-ever meme, but it’s interesting to see that people have hated the way they were captured in photos a century ago. A 1921 meme is still just as relatable today.


from PetaPixel https://petapixel.com/2018/05/30/this-1921-cartoon-about-photos-is-one-of-the-first-memes/

Man Climbs NASCAR Fence for Closeup Photos of Racecars

During the NASCAR Coca-Cola 600 race at the Charlotte Motor Speedway this past weekend, one fan apparently decided that his camera wasn’t close enough to the action, so he decided to climb the 30-foot-tall+ catch fence for ultra-close up photos of racecars speeding by below him at an average speed of 140mph (~225km/h).

Fellow spectator Vance Hicks Jr. was in attendance and captured the 1-minute video above showing the incident.

Security was understandably not pleased with the fan’s antics. One security guard quickly approached, climbed up partially himself, and yanked the fan down by the seat of his pants.

The fan was immediately ejected from the track and told not to return, Yahoo Sports reports, which also notes that he seems he avoided legal issues, as there are no records of an arrest over the incident by the city’s police department.


from PetaPixel https://petapixel.com/2018/05/30/man-climbs-nascar-fence-for-closeup-photos-of-racecars/