In this article, I will explain Lightroom Collections, a very powerful cataloging feature. We’ll focus on how using Lightroom Collections and Collection Sets can help you build a significant portfolio of your best work. Then we’ll move on to the difference between Standard and Smart Previews and how combining Smart Previews with Collections makes it even easier to review and process your best work. Next, we’ll learn how Lightroom Mobile dovetails with Collections and finish up with a few tips on using both of them to share your images. It’s a lot of info (it’s a long one) so buckle up.

A little background first
A year ago at a photography conference run by a consortium of local camera clubs, I had the pleasure of introducing Lightroom expert Tim Grey to the audience. After I introduced him, I sat in on his seminar. He asked everyone to raise their hands if they organize their image files chronologically by date. Knowing that most experts agree this is a terrible way to organize your files, very few attendees admitted to organizing this way. I raised my hand because of course, I do. It just makes my brain happy to be chronological. Mr. Gray asked me how I could ever keep track of or find images by date, so I explained how I also used Lightroom Collection Sets and Collections. He laughed at me and told me to put my hand down. He felt I didn’t really organize things chronologically at all.
Use Lightroom Collections to Build Your Portfolios
The main goal of Lightroom Collections is to create cohesive groupings of your best images. Naming and how you sort and organize your images is up to you, based on how and what you shoot. The key to building a portfolio using Collections is to include only your absolute best images. If you shoot 10,000 images on a two-week photo trip, the images you put in your Collections are the top 1%, the best-of-the-best. These are the ones you share online, upload to sell as stock images, prepare an exhibit or your work, or make some prints for your own walls.
How to Create Collections and Collection Sets
You can find Collections in the Develop Module, on the left-hand panel between Folders and Publish Services. To create a new Collection or Collection Set, click the + (plus sign).
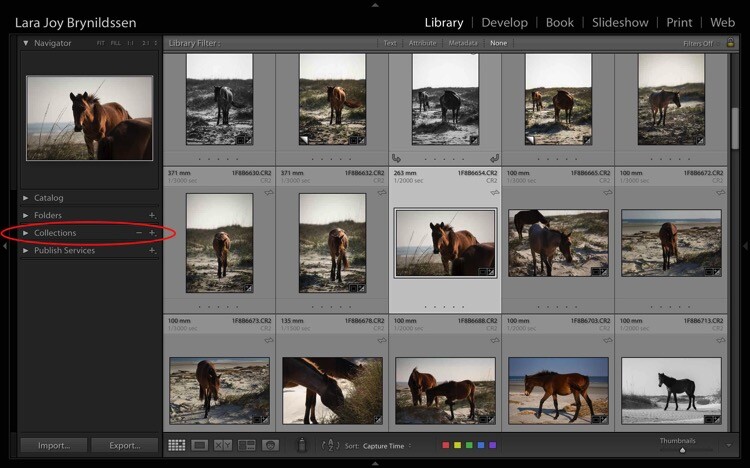
Once you click the + (plus sign), a dialog box pops up. Click Collection Sets to create a container that will hold multiple, related Collections. Or, if you just have one group of images that isn’t related to anything else, click Collections.
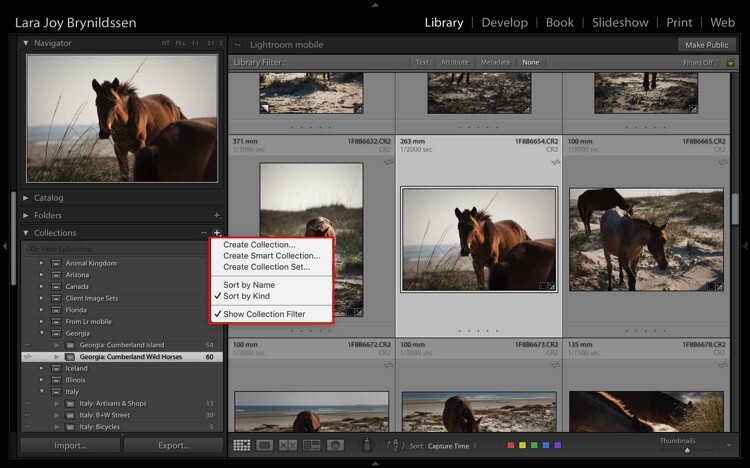
NOTE: In this article, we’re focusing on Collections, not Smart Collections, which work a bit differently. Read this for more on that topic: How to Create and Use Smart Collections in Lightroom.
Collections Versus Collection Sets
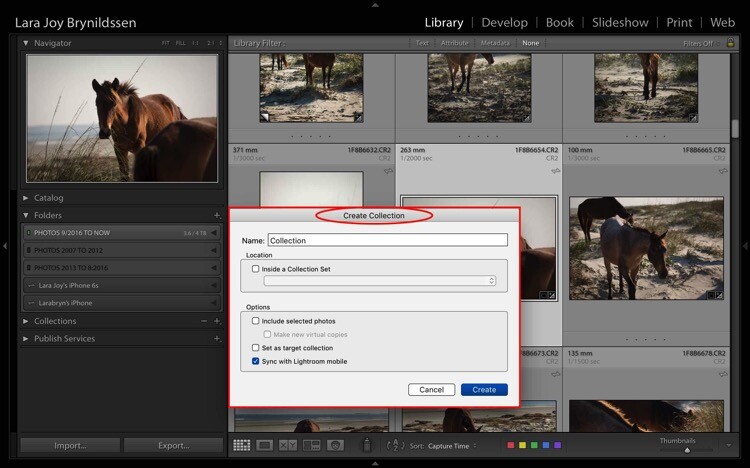
This is the dialog box for creating a Collection.
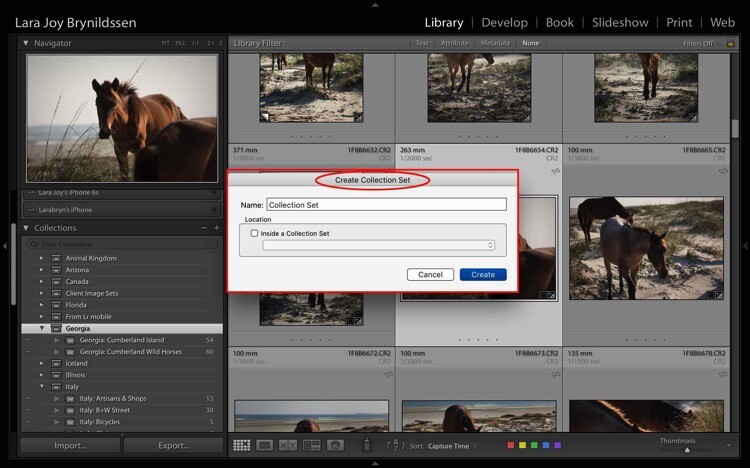
This is the dialog box for creating a Collection Set.
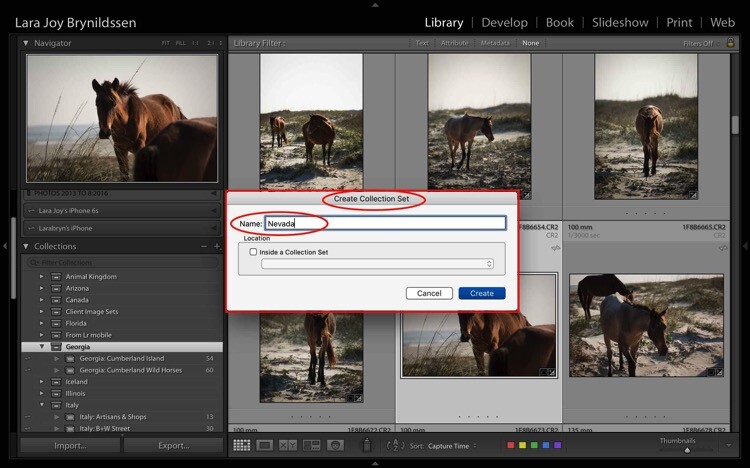
I’m headed to Nevada soon so I created a new Collection Set for Nevada. To do this, type the title of your Collection Set in the 1st box and click Create.
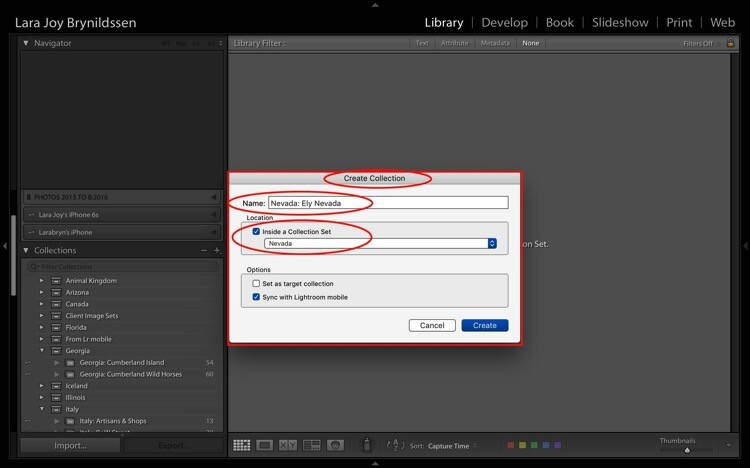
When I’m in Nevada, I’ll be staying in Ely so I created a Collection within my Nevada Collection Set for Ely.
To do this, first, check the box indicating that this Collection sits inside the Nevada Collection Set. When titling Collections, repeat the title of your Collection Set (e.g. Nevada: Ely Nevada). This is important because it helps maintain the file structure in Lightroom Mobile. (More details on that in a few paragraphs.) Make sure you also check the box to Sync with Lightroom Mobile.
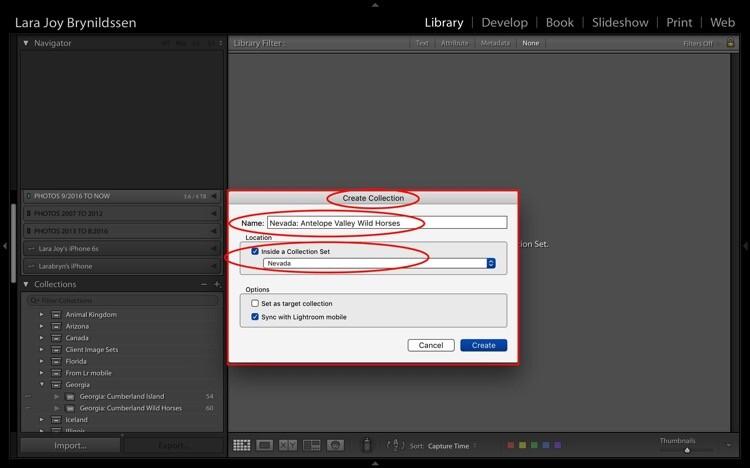
Second Collection for wild horse images.
I’ll also be photographing the wild horses in the Antelope Valley HMA, so I created a second Collection within my Nevada Collection Set for that called – Nevada: Antelope Valley Wild Horses (as shown above).
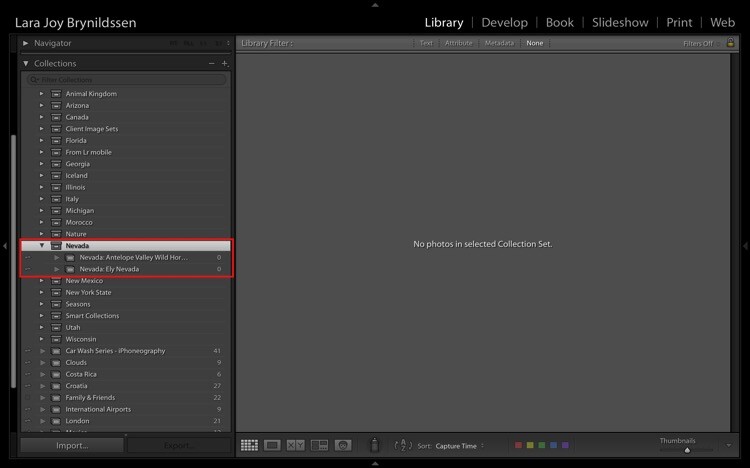
Now you can see the new Nevada Collection Set within the Collections tab on the left panel (below). Note that the icon for the Collection Set is like a large file box. The icons for the two collections inside of it are smaller, like file folders. Both say that they contain zero images because I haven’t added anything to them yet.
How to Name Your Collections Sets and Collections
As you can see, I most frequently organize based on location. My Collection Sets are often names of countries or American states. That works for me since I travel a lot to make my images and I often go back to the same places over and over again. When I create a collection of my best images of Italy, I’m not interested in whether I made the image in 2013, 2014, 2015 or 2016. I’m interested in whether it’s the best image I’ve ever made in that region of that subject.
If you’re a macro flower photographer, it might make more sense for you to name your images by flower type and color. E.g., your Collection Set could be called Peonies, and your Collection names would be Peonies: Pink, Peonies: White, Peonies: Purple.
You would be able to continue that naming structure across all flower types that you photograph: Zinnias, Dahlias, Daisies, etc. By naming this way, if you get a request for an image of a pink peony, you know exactly where to find it. Click your Peonies Collection Set and scroll down to the Collection called Peonies: Pink.
If you want to have more comprehensive portfolio-like collections, you can have a Collection Set called “Best of”. Your Collections can be called Best of: Peonies, Best of: Zinnias, etc. You can even have a Collection called Best of: All Flowers, which would be the most superlative macro flower images you have ever made.
Collections Add a Second Level of Organization to Your Files
Basically, Collections are a secondary organization structure for your images. The first (for me) is chronological organization. Think of those folders as archives. All images live there. Collections are a second tool to harness the best of those images and make them easier to find. How you name them doesn’t matter as much as consistency. By consistently naming your Collections, you’ll be able to take the most advantage of their features and quickly locate your portfolio-worthy images.
Think of a Collection like a bookmark. Each time you create a Collection, you’re basically bookmarking the images inside of it so that you can quickly and easily find them by clicking on that Collection. You can bookmark each image as many different ways as you want by adding them to multiple Collections. A flower image could be in your Collection called Peony: Pink. It can also be in Best of: Peonies and Best of: All Flowers.
The main purpose is always to include your best work. You never want to scramble to find that great image you think you took two years ago in in Italy but you’re not sure exactly when? Or what town? By using Collections, you’ll always know exactly how to find that awesome image which is worth its weight in gold.
Adding Images to Collections

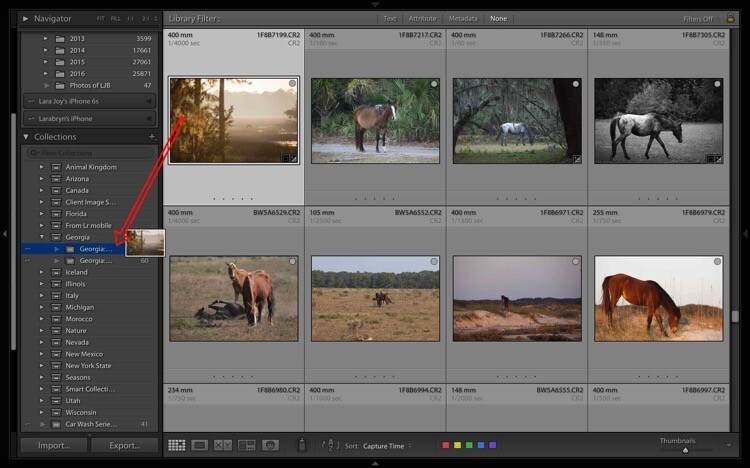
Now that you know how to create and name Collections, and why they’re useful, YOU need to add some images to them. First, select an image. The one above is from a group of images I made on a recent trip to Georgia (USA). I like it and have processed it, so now I select and drag the thumbnail to the Georgia: Cumberland Island Wild Horses Collection. Once the Collection name is highlighted, just release the image and it will drop into the Collection.
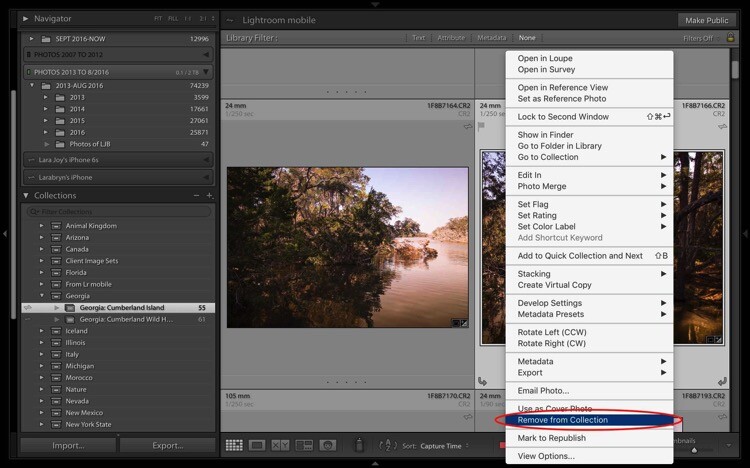
To remove an image from a Collection, first select it. You can see it’s highlighted in pale gray, which means it’s been selected. Right-click and when the menu pops up, scroll to the bottom and select Remove from Collection. Voila! The image will be removed from the Lightroom Mobile Collection too.
Bonus Feature That Makes Collections Even More Useful
If you are looking through your Collections and find the perfect image, but wish it was shot in vertical rather than landscape format, you need to be able to find the original folder where your image file lives. Luckily, Lightroom builds in a neat little trick to help you to quickly jump to that folder.
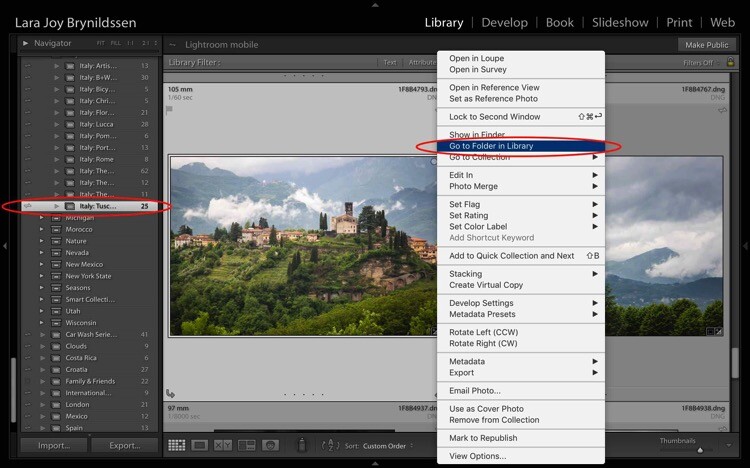
For example, in the Italy: Tuscany Collection, there is a beautiful landscape looking over Barga with lush green grass and heavy clouds sitting on the mountains above the village. To check whether this image is available in a vertical orientation, select the image and right-click to bring up a menu. Scroll to the top of the menu and click; Go to Folder in Library.
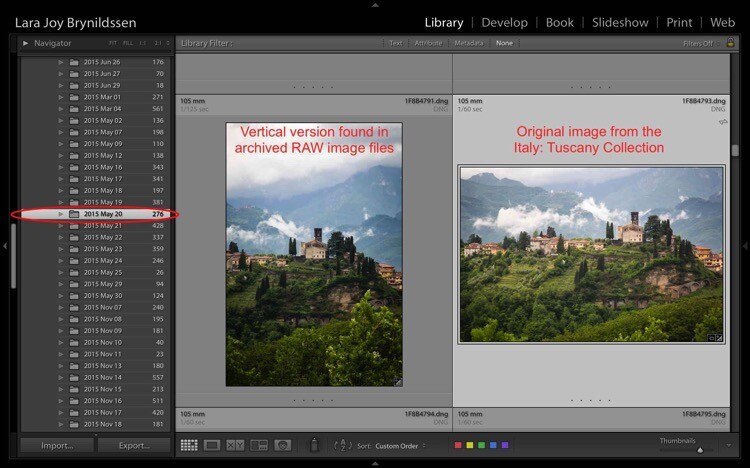
Lightroom takes us from the Italy: Tuscany Collection to the main folder where all of the RAW images taken that same day actually live on the hard drive. You can see in the left side panel we’re now in the 2015 May 20 folder. I think of these folders as archives. They contain all the RAW images I shoot, even the so-so ones or the ones that are near duplicates of other, better images. And – good news – there is a very similar image in a vertical orientation.
Standard Previews Versus Smart Previews
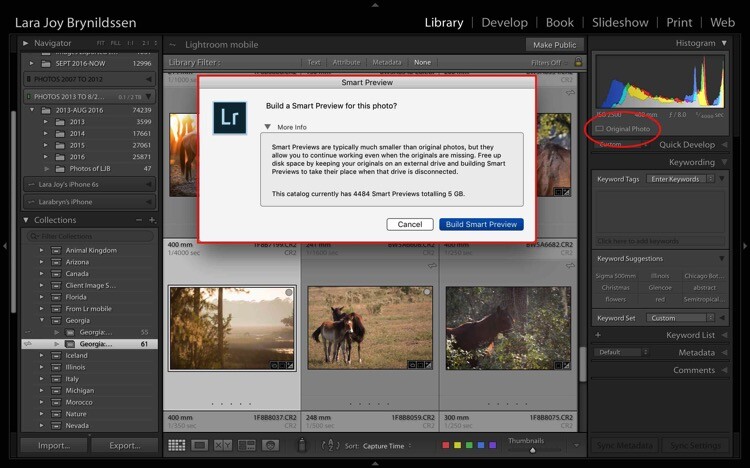
Whenever you upload images using Lightroom, Lightroom creates a small Standard Preview. This preview is like a tiny little jpeg allowing the program to quickly show you your image. If you want to edit that image, Lightroom usually needs to be able to access the original image file.
If you have just a few images, you can keep the files on your computer’s hard drive but since you’re an avid photographer, you probably have your images saved on external drives. The more images you take, the more external hard drives you probably have containing all of your images. If you’re looking for your best Italy images from the last 10 years, you might have to look through images on four hard drives. That can get a little unwieldy. To solve this problem, create Smart Previews for all of the images that you have organized in your Collections.
Creating a Smart Preview
To create a Smart Preview, click on the icon next to where it says Original Photo in the right side panel. A dialog box will pop up. Click Build Smart Preview.
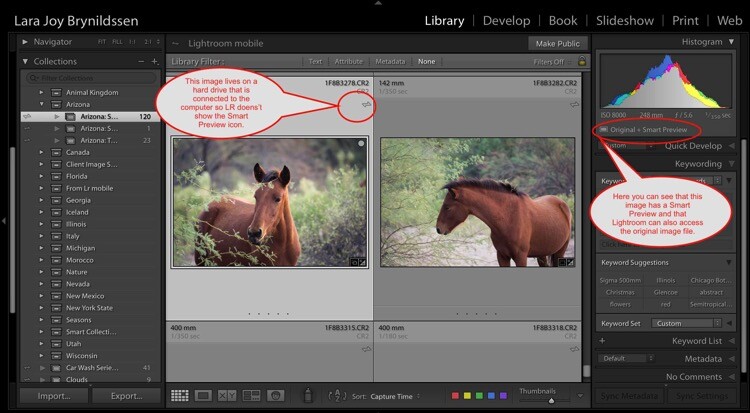
Now in the right side panel, you can see that the icon has changed and the text now reads Original + Smart Preview.
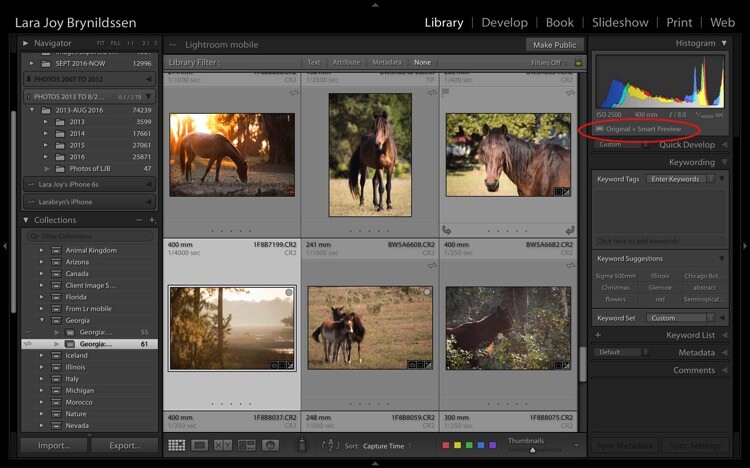
A Smart Preview is a larger jpeg than the Standard Preview. The advantage is that it lives on your computer with your Lightroom Catalog files. A Smart Preview takes up far less space than an actual image file but it still contains plenty of information available in it for you to increase the size of the image on your screen, to magnify the details, and even to process it within the Lightroom Develop Module. Any changes you make to the Smart Preview will carry over to your original image once you connect your hard drive too.
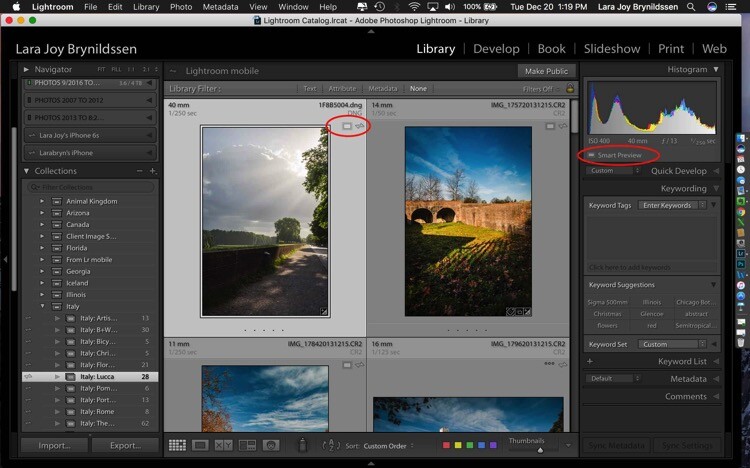
This file is a Smart Preview. You can see the icon on the image and also in the side panel on the right.
If you click on that icon, Lightroom shows a dialog box letting you know the image isn’t available but that Lightroom knows where it should be. In this case, if I attach the external hard drive and click Locate, Lightroom will find the image for me. Note that LR is also telling me that I can process the image without the original which is exactly what I want.
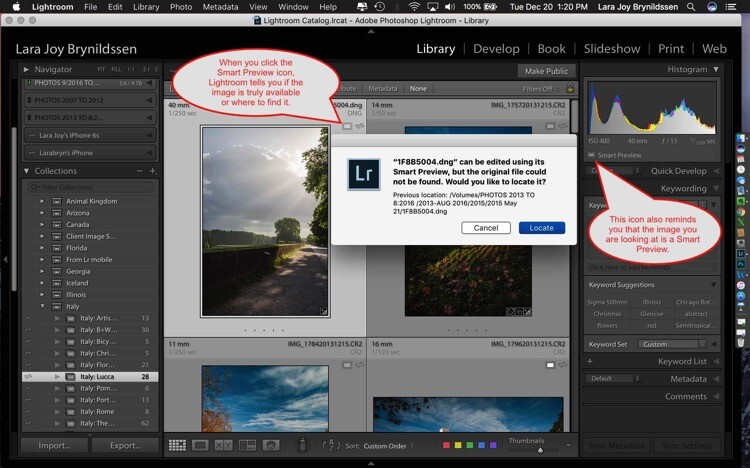
NOTE: You cannot export an image if you are only working from a Smart Preview. You also cannot edit it outside of Lightroom (e.g., like Edit in Photoshop).
Here you can see that since the external hard drive for this image is attached to the computer, the full image file is available. Lightroom doesn’t show the Smart Preview icon in the Grid View since you’re working with the actual file. In the side panel on the right, LR does show you that this image has a Smart Preview available.
How are Smart Previews Helpful?
Let’s say you’re printing images for a solo exhibition, and want to showcase your images of Italy. There’s no need for you to slog through the 25,000 images on your miscellaneous external hard drives. All you need to do is open Lightroom, click on Collections, and scroll down to your Italy Collection Set.
Because you’ve made Smart Previews for all your images, you don’t even need to have the hard drives which contain the actual images connected to your computer. This is the key to pairing Smart Previews with Collections. Even if your external hard drives are at home and you only have five minutes before you head back to work, you can begin selecting exhibition images on your laptop. Once you get home and can connect to your external hard drives, you can finish the selection and start printing.
How Lightroom Mobile Dovetails with the Collections Feature
If you are an Adobe Creative Cloud member you are getting so many more features than constant updates to Photoshop and Lightroom. One of those features is Lightroom Mobile. The mobile app doesn’t have the processing power of the full version but I don’t typically use it to edit images so that’s not an issue for me. I use it mainly to have my best images at my fingertips all the time.
Sync with Lightroom Mobile
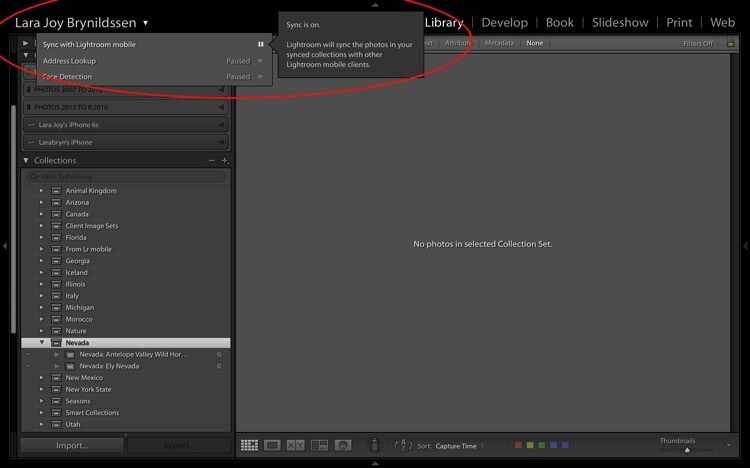
To Sync with Lightroom Mobile, you need to be logged in to your Adobe CC (Creative Cloud) account and you have Sync turned on. Click your nameplate in the upper left corner to ensure you are logged in and Sync is on. My nameplate has been customized, yours might simply say Lightroom. Here you can see that Face Detection and Address Lookup are off but that Sync is on. If you’re ever confused about the on and off positions, just hover your cursor over the box or triangle. A dialog box will pop up letting you know if that feature is on or off.
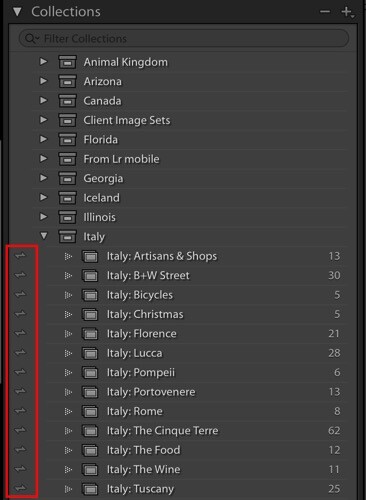
On the left of each collection is a double-sided arrow (see below). This indicates that these Collections are being synced with Lightroom Mobile.
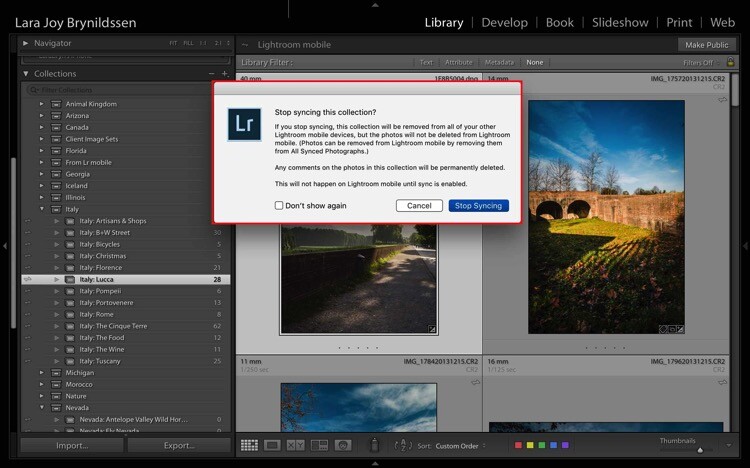
You can toggle Sync with Lightroom Mobile on and off by clicking this arrow. When you turn syncing off, Lightroom will double check with you and let you know that it will remove these images from Lightroom Mobile too.
If you leave Sync with Lightroom Mobile on, Lightroom will sync the images in your Collections to the mobile app. This is a good time to install the app on your phone and tablet if you haven’t already. Now that you’ve installed the mobile app and logged in, your phone or tablet will be busy grabbing copies of those collections.
While Lightroom Mobile is working, you’ll see the cloud icon in the upper left-hand corner will have three moving dots. When the dots stop moving, the mobile app should be synced with your desktop or PC.

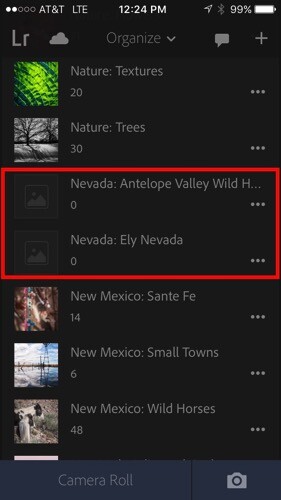
Remember earlier when we created a Nevada Collection Set? And then created a Nevada: Ely Nevada Collection and a Nevada: Antelope Valley Wild Horses Collection? Here they are in Lightroom Mobile.
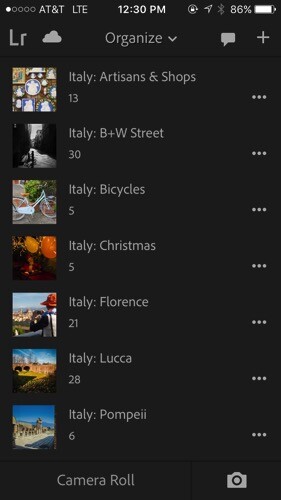
We’ve been working a lot with the Italy Collection Set too and you can see all of those folders here on the mobile app.
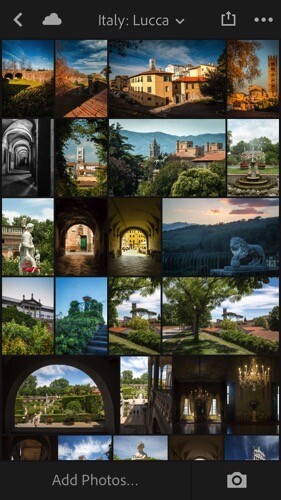
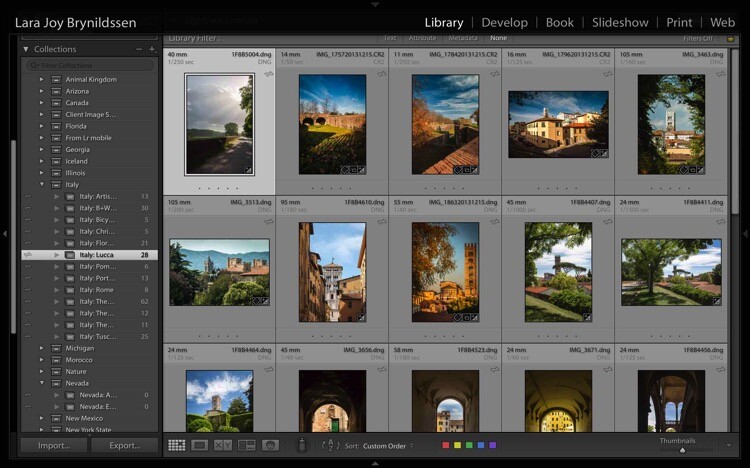
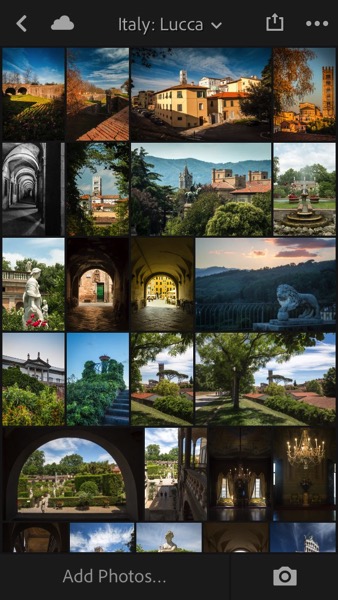
When you click on one of the folders – for example, Italy: Lucca – you’ll see that the images are exactly the same as they are on the desktop version.
Why Collection Names are Important in Lightroom Mobile
Remember back when we were setting up our Collection Sets and Collections on the desktop version? We repeated the name of the Collection Set in each Collection. It seems a little clunky to do it that way but hopefully now that we’re in Lightroom Mobile, you can see why we’ve chosen to name things that way. Lightroom Mobile doesn’t have Collection Sets. Instead, the mobile app organizes everything alphabetically by title.
If we hadn’t repeated the name of the Collection Set when we named our Collections, the names wouldn’t be specific enough. For example, I might not know what images are in a file called Artisan Shops if I don’t know those shops are in Italy. Now, by adhering to this slightly clunky naming structure, if someone (i.e. a publisher, client, gallery owner, friend or fellow photographer) wants to see your Italy images, you can open the app on your phone, scroll down the alphabet to Italy and show them the most important group of images.
NOTE: You can actually change the organization method in Lightroom Mobile by clicking the Organize menu. For our purpose of building portfolios of your best work, it’s best to stick with the default, Alphabetize by Title.
Using Collections to Share Images from the Desktop Version of LR
For many of us, sharing our images is the very heart of why we do what we do. Lightroom has built some handy features right into Collections to make it as easy as possible to share our portfolios.
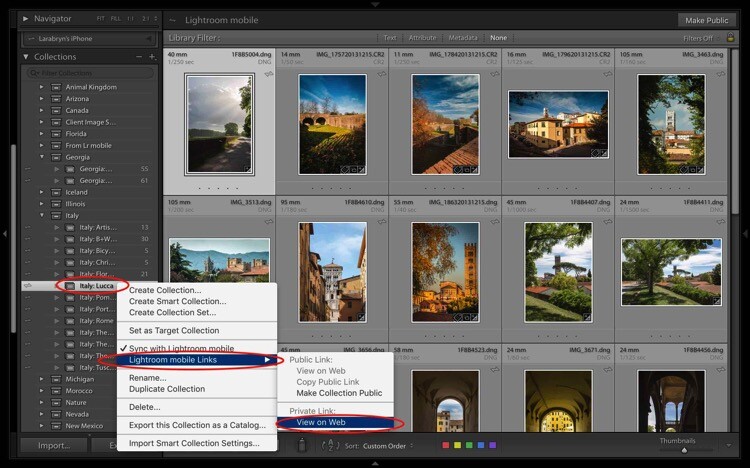
Let’s start with the desktop or full version of Lightroom. The first way we can share a Collection or portfolio of images is by right-clicking on a Collection. Let’s click on Italy: Lucca. A dialog box pops up. Click on Lightroom Mobile Links. Then, in the second dialog box, under Private Link, click on View on Web.
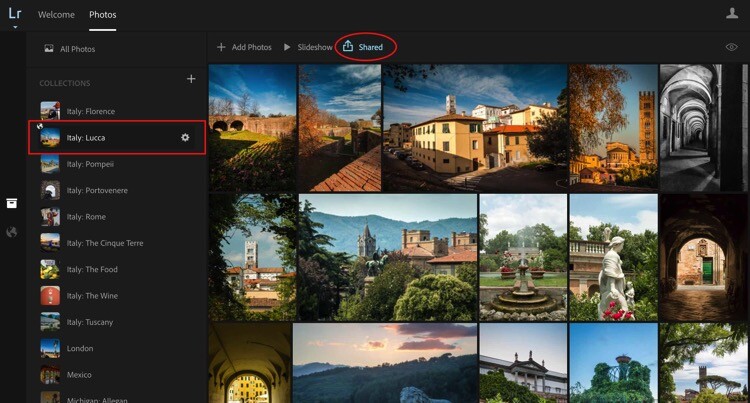
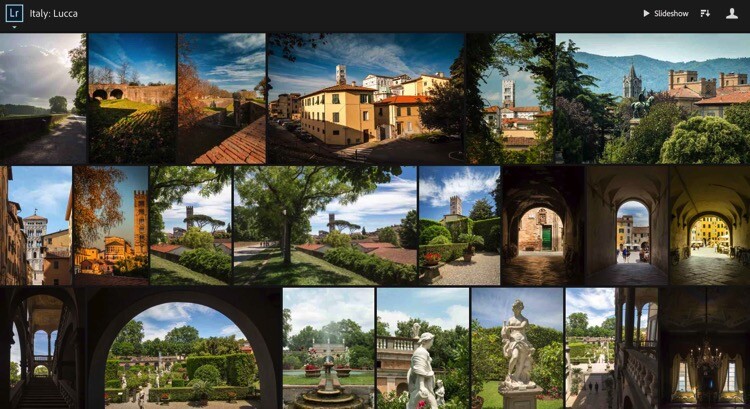
That takes us online to Adobe.com. If you’re not signed in, you’ll need to sign in now. You can see that once again, we’re in the same collection where we started. It’s titled the same and the images are in the same order. You can easily share by clicking on the Shared icon that is a box with an arrow sticking out of it.
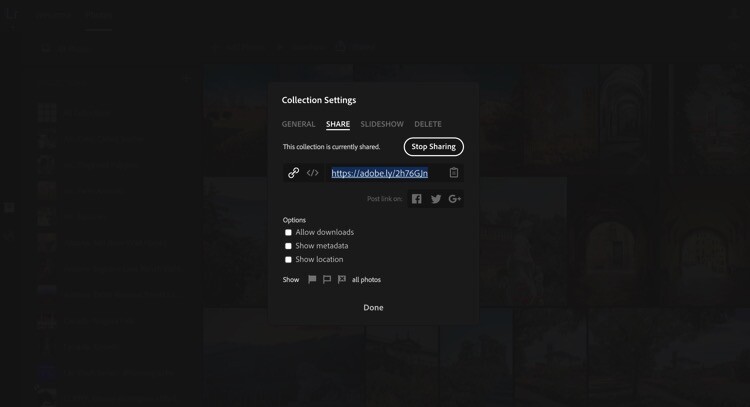
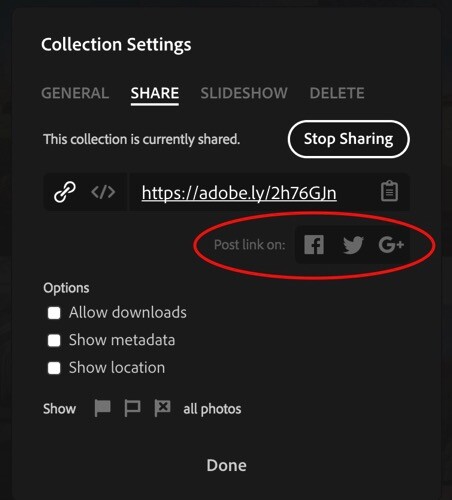
Once you click that icon, another dialog pops up. This dialog gives you a link to share. Here’s the link to my Italy: Lucca Collection. https://adobe.ly/2h76GJn. There are also a few options you can choose to specify how much about your images you want to share.
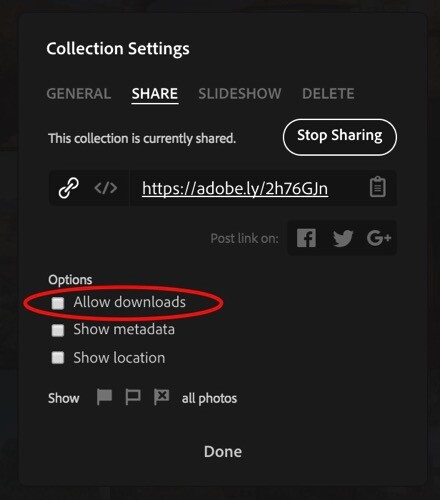
Depending on where you’re sharing your Collection and why the only box I would suggest you almost never check is Allow Downloads. If you prefer to be credited for your work and to be paid, do NOT check this box or allow anyone to download your images.
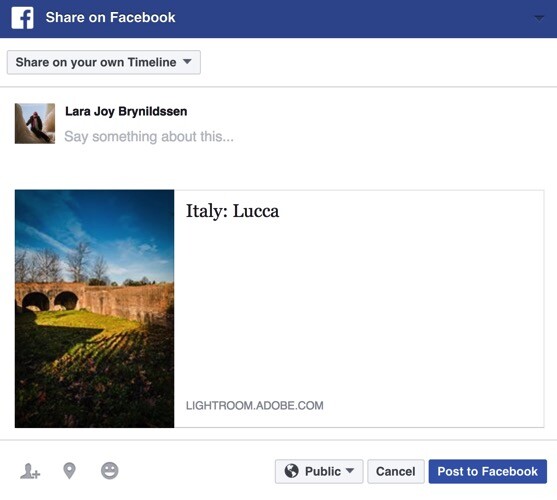
You can share your entire Collection on Facebook, Google+, or Twitter too. Tap the icon for your favorite social media site and follow the prompts. Lightroom will post the link to your entire Collection.


Another way you can share your images from the desktop or full version of Lightroom is to click the Make Public button in the top right corner.

Once you click that link, Lightroom will generate a public link.

When you click a public link, Lightroom again takes you to Adobe.com only this time, you’re not the only one who can see it. Anyone online can see your public Collection as a web gallery. To make the Collection private again, just click the button that says Make Private.
Using Collections to Share Images from Lightroom Mobile
You can also share from the Lightroom Mobile in almost exactly the same way, with the same options.
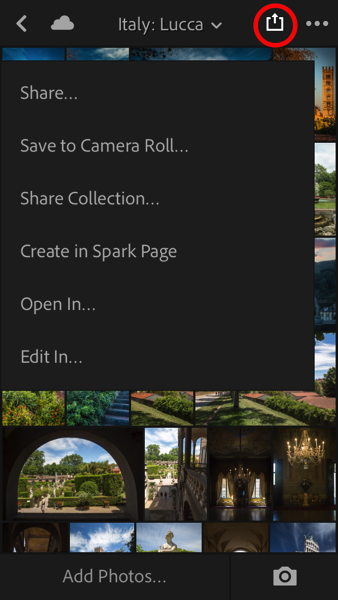
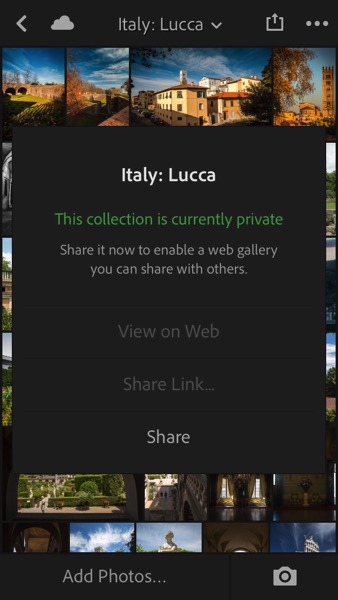
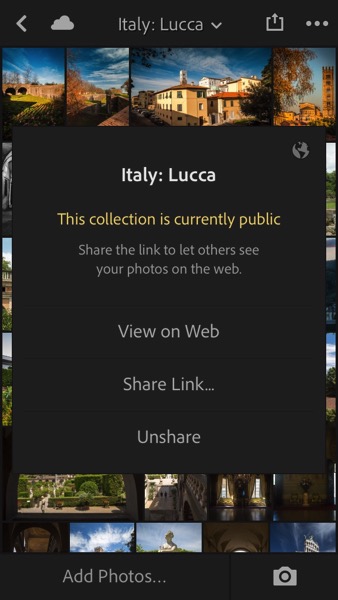
Here we have the Italy: Lucca Collection. When you tap the Share button (the box with the arrow sticking out of it), you pull up a dialog. Tap Share Collection. Another dialog box pops up giving you the option to make the Collection Public by tapping Share at the bottom of the dialog. If you change your mind, tap Unshare.
 |
 |
 |
 |
Why do you even need these links?
You might be thinking at this point that while it’s pretty cool to have shareable links to your Collections, you don’t really need them. That brings us back to the idea of building a portfolio. Regardless of whether you are an amateur photographer hoping to go pro someday, or whether you are a very serious enthusiast, building a portfolio is going to help you improve your photography.
More than that, sharing your portfolio enables you to get feedback on what you think are your best images. If you have a trusted mentor, you can share a link to one of your Collections with her, she can view the images, comment, and you can use her feedback to improve.
These links can also be used to share the image files from your shoot if you are a pro and work with clients. If you’re looking to sell your travel images, you can share a link with a local tourism bureau or to a travel magazine when you pitch a story. Or, if you were in Italy with friends and want them to see why exactly you always carry 30 pounds of camera gear with you when you travel, send them a link to one of your Italy Collections. They’ll re-live the trip as they scroll through your images and maybe even offer to carry some of your gear the next time you travel together.
Sharing to Instagram from Lightroom Mobile
Your sharing options from Lightroom Mobile are similar to the sharing options from the full desktop version and also include Facebook, Twitter, and email. One of the best ways to use the Lightroom Mobile app is to share to Instagram. Since uploads to Instagram can only be done from your phone, if you want to share images from your DSLR, it’s always a bit of a trick getting them over to your phone in a quick, easy way. Lightroom Mobile is the perfect solution.
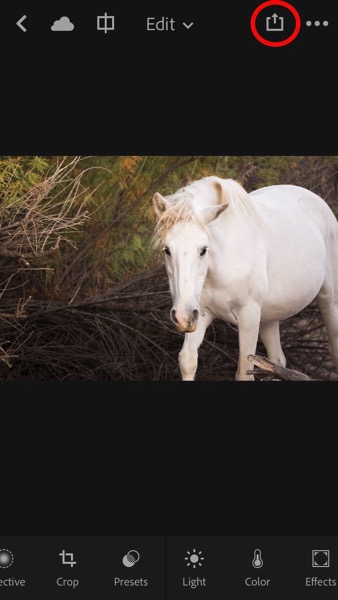
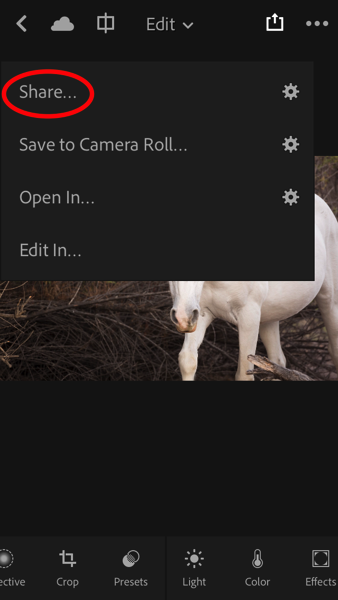
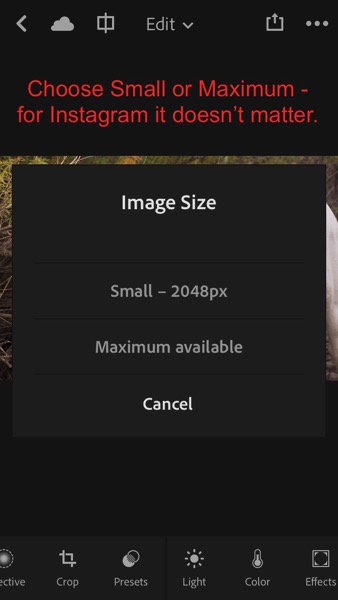
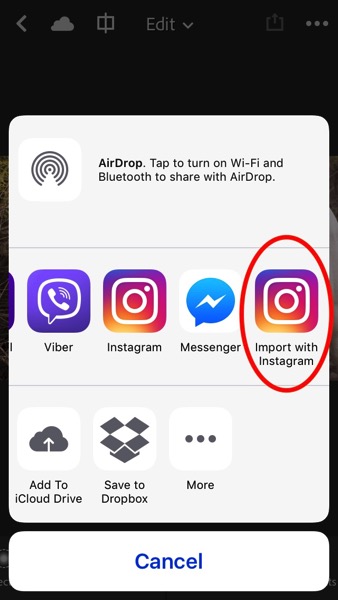
My Instagram feed is only images of horses so let’s jump to Arizona: Salt River Wild Horses Collection. Click on the image you want to share. Tap the Share button (the box with the arrow sticking out of it). In the dialog box that opens, tap Share…. Then, in the Image Size dialog box that opens, tap either one (it doesn’t matter so much for Instagram). Finally, in the next box that opens, click the icon that says Import with Instagram.

 |
 |
 |
 |
 |
 |
You might also see an icon that just says Instagram. I don’t use that one because it gives fewer options. The Import with Instagram button takes you right into the app with all the native options to Instagram. Now you’re all set. Caption and hashtag as you normally would and go on your merry way.
NOTE: I’ve really just posted that image to Instagram. Go find it and give it some love so I can give you bonus points for reading all the way through this very long article.

As long as you consistently sync to Lightroom Mobile, you can easily share your images to Instagram on a daily basis and eventually, your feed will be a living portfolio of your best images.
How do you use Lightroom Collections Sets and Collections?
The goal with this article was to show you how to set up and use Lightroom Collections to build your portfolio, to demonstrate the utility of Smart Previews, to clarify how to sync with Lightroom Mobile, plus a few tips on using Collections to share your images.
Do you use Lightroom Collections? Do these ideas work for you?
Share with me in the Comments below. I’d love to know how you build and share your portfolios.
The post Four Advantages of Using Lightroom Collections by Lara Joy Brynildssen appeared first on Digital Photography School.
from Digital Photography School http://digital-photography-school.com/four-advantages-using-lightroom-collections/
No comments:
Post a Comment