We’ve all been here before. You get home from an afternoon with your kids in the park, at the ball game, or even a formal photo session only to load your pictures on the computer and realize that many of them are fuzzy, blurry, or just plain out of focus. It’s a problem that has plagued photographers for years. While new cameras offer all sorts of features like 3D focus tracking and real-time face detection to help make sure to get the ultimate tack sharp photos, the fact remains that out-of-focus images are still an issue for just about everyone with a camera.
It’s an unfortunate reality of the way cameras work with incoming light, and until we are all shooting with Lytro-style light field cameras we are all going to have the occasional out-of-focus picture or two. Fortunately, there are a few relatively simple things you can do to make sure your pictures are indeed as sharp as possible.

Use a fast shutter speed
The world around you is constantly in motion, and having a camera means you are equipped to freeze that motion into a single frame. Depending on what you are shooting the result can sometimes be a blurry mess, which is often the result of a shutter speed that is simply too slow. There’s an old bit of conventional wisdom that says the minimum shutter speed needed to get a sharp image of a still subject is 1/focal length. So if you are shooting with a 50mm lens you need a shutter speed of 1/50th of a second.
Note: Due to the cropped sensor on cameras like the Canon Rebel series or lower-end Nikons the formula becomes 1/(1.5x focal length), so you would need a minimum shutter speed of 1/75 second.
This might sound fast but it’s actually not, especially if you are shooting in low light conditions or with a small aperture on your lens. It gets even worse when your subject is moving, in which case you need a much faster shutter speed! This is why many mobile phone pictures end up looking blurry, in order to let in enough light to get a photo they often use slower shutter speeds.

This jittery squirrel was moving all over the place, so I shot with a speed of 1/180 second to get a sharp picture.
Proper settings
The solution is to use a faster shutter speed, which might sound fairly obvious but it doesn’t always work unless you have your camera configured properly. If you shoot in Auto your camera might not know you want to use a fast shutter speed. So shooting in Program or Shutter Priority is a good way to control the shutter speed to make it as fast as you want.
You can also utilize higher ISO settings like 1600 or 3200, which look just fine from most modern cameras if you need a fast shutter and there isn’t much light. Most photographers would take a slightly grainy (noisy) photo that can often be fixed with software like Lightroom or Photoshop over a blurry photo that can usually not be fixed. If you find that you consistently get blurry pictures of your subjects, try increasing your shutter speed and you just may just be surprised with the outcome.
Use a smaller aperture
The lens on your camera is designed to gather incoming light and focus it so you can take a picture. The amount of light it lets in is largely dependent on the size of the physical lens opening. A bigger opening, or aperture, lets more light pass through than a smaller opening, much in the same way a bigger hole in the bottom of a bucket lets more water leak out than a smaller hole. Wider apertures let you use faster shutter speeds and also help you achieve the type of beautiful out-of-focus backgrounds, called bokeh, that are common in portrait, wildlife, or even sports photography.

Even though my 85mm lens has a maximum aperture of f/1.8, I shot this at f/2.8 because I wanted a wider depth of field in order to make sure all three subjects were in focus.
Depth of field
One tradeoff that comes into play when using wide apertures, is that your depth of field is much shallower. That means you have a very narrow section of the image that will actually be in focus or tack sharp. Under very carefully controlled conditions this can be fine and even quite desirable. But in many situations, a thin depth of field can result in more headaches and frustrations than it’s worth.
Shooting with a wide aperture can result in a depth of field that is so narrow a person’s nose could be in focus but her eye might not. One of the best solutions is to just use a smaller aperture. The tradeoff when using smaller apertures like f/2.8, f/4, etc., is that your background won’t be quite as blurry and you will need a longer shutter speed, but if your lighting is good the latter won’t matter. And as for the former, I like to err on the side of caution and go with a technique that will give me a higher chance of having my subject sharp and focused, even if it means a slightly less blurry background.

Use cross-type focus points
Almost every interchangeable-lens camera has one or more cross-type focusing points. That means they look along the horizontal and vertical axes to make sure things are tack sharp before taking a picture. These points are the little dots or squares you see when you look through the viewfinder of your camera. The ones that are cross-type are usually a bit faster and give you better results than their single-axis counterparts. Of course, you will need to know which of the points on your particular camera are cross-type but a quick online search of your camera model and “cross type focus points” will usually get you the information you need.

The center focusing points on my D750 are all cross-type, so I like to use them whenever possible in order to make sure to get maximum sharpness.
Cross-type focusing points are usually limited to a certain portion of the viewfinder. This can present a bit of a problem since normal-type focusing points are what is commonly used to lock focus on objects along the outer edges. A solution I like to use for these situations is the focus-and-recompose technique. I use a cross-type focusing point, often the one right in the center, to lock focus and then recompose my shot to frame it how I want. This does not always work when shooting wide open since even the smallest amount of movement can affect your shot when the depth of field is razor thin. But as I mentioned earlier, if you want tack sharp pictures you should probably stop your aperture down a little bit anyway.

Sharpness is critical when shooting macro pictures, so I used a small aperture (f/8) and cross-type focusing points to make sure the tips of the petals on the foreground tulip were tack sharp.
Use a tripod and Live View and zoom in to 100%
If you’re like me, you spend 99% of your time looking through the viewfinder of your camera as opposed to using the Live View function (where you use the LCD screen on the back of your camera to compose your shot). DSLRs have traditionally been designed for photographers to use the optical viewfinder which is why this method is generally faster and easier to use. But Live View has some very good features as well depending on the type of photos you want to take. If you are doing a lot of action shots like sporting events the Live View function is quite frustrating. But if you shoot landscapes, products, or other types of pictures where your subject remains relatively still, Live View can be a major advantage in terms of getting the sharpest image possible.
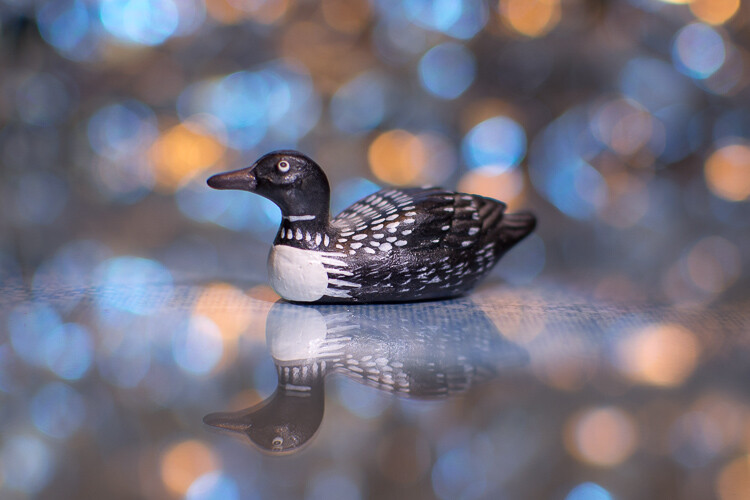
Using Live View helped me get this small wooden duck tack sharp and focused.
Using Live View
The trick to using Live View for getting sharp images is to frame your shot with your camera on a steady surface such a tripod, then zoom in to 100%, using the controls on your camera. This gives you an ultra-close-up look at your image, and you can then use autofocus or manual focus to make sure everything is perfectly tack sharp.
While the autofocus points in the viewfinder do a good job, this type of 100% magnification shows you precisely how in-focus your image will be and helps you get pixel-perfect images. Landscape (and macro) photographers often use this technique, combined with small apertures for a wide depth of field, to get pictures that are much sharper than they could otherwise. It’s a tip that I highly recommend you try, especially if you don’t often shoot in Live View.

I wanted to get this 30-second exposure as sharp as possible. So I first used Live View and zoomed in to 100% to check that the foliage was focused.
Bonus tip: Use Focus-Peaking on mirrorless cameras
Most of the items in this article are geared towards traditional DSLR shooters, but if you use a mirrorless camera there is one handy tool you probably have that gives you a leg up on your traditional-style camera counterparts.
Focus-Peaking is a way for your camera to show you precisely what is tack sharp as you focus your lens. Many, but not all, mirrorless cameras have this capability and it is a fantastic way of making sure you get everything that should be tack sharp focused properly. With Focus-Peaking enabled, as you turn the focusing ring on your lens you will see a swath of dots (usually red or green) travel across the viewfinder. These dots indicate the spots that are perfectly focused, and when you see an outline of dots around the part of your image that you want focused, you can snap a picture and rest assured that it will show up exactly how you envisioned.
You can even use Focus-Peaking in conjunction with autofocus, so it’s another tool in your repertoire to help make sure you are taking the best possible pictures.

The edges of the leaves are all outlined in red by Focus-Peaking, which indicates that they will be in focus. Image by Bautsch (Own work) [CC0], via Wikimedia Commons
Over to you
Do you have any favorite tips or tricks for getting sharp photos? Are there things I left off this list that you’d like to share with others? Leave your thoughts in the comments below!
The post 4 Secrets for How to Get Tack Sharp Photos by Simon Ringsmuth appeared first on Digital Photography School.
from Digital Photography School http://digital-photography-school.com/4-secrets-get-tack-sharp-photos/
No comments:
Post a Comment