Thursday, 31 March 2016
Photoshop of the Future May Be Able to Auto-Colorize a B&W Photo
![]()
Colorizing old black-and-white photos with Photoshop has been a popular subject on the Internet over the past few years, as skilled retouchers use their time and skills to offer a new view of vintage images. In the future, though, software may be able colorize B&W photos with the click of a button.
Automatically colorizing black-and-white photos is a problem that computer science researchers are hard at work on. In a new paper titled “Colorful Image Colorization,” UC Berkeley computer vision PhD student Richard Zhang and his team share how they’re using a “convolutional neural network” to create automatic colorizations that can often fool humans.
Their new system is full automatic — other past systems have required a great deal of use input — and is trained on over 1 million color photos. Compared to previous systems, this new one creates colorized photos that are more vibrant and realistic.
![]()
To test the system they created, the scientists found human test subjects and showed them two versions of photos — one would be the real color photo, and the other would be one that artificially colorized by the software. The humans were asked to figure out which was which.
20% of the photo pairs actually fooled the humans, meaning the colorized versions were guessed as the real color photos — this “fool rate” is much higher than prior research in this area.
Here are some sample photos that were automatically colorized by the system. This first set contains photos by renowned landscape photographer Ansel Adams (left is the original Adams shot, and right is the colorized one):
![]()
Here’s another before-and-after using photos by photographer Henri Cartier-Bresson:
![]()
While the results aren’t perfect, it’s a big step in the right direction. Researchers are working on making the results indistinguishable from actual color photos.
If you’d like to read into the technical details of this research, you can do so on the website and in the full paper. Demo code has also been released on GitHub if you’d like to run it yourself.
Perhaps one day we’ll find an Auto-Colorize feature built into Photoshop that turns a monochrome photo into a color one with a simple click of your mouse.
from PetaPixel http://petapixel.com/2016/03/31/photoshop-future-may-able-auto-colorize-bw-photo/
Photographer Shot ‘Ghost Girl’ Photos for Mom Arrested for Murder
![]()
One photographer received quite a shock recently when he found out that one of his clients had been arrested for murdering her daughter. He had been hired by the “grieving” woman to create Photoshopped “ghost girl” photos at the grave site.
Pennsylvania photographer Sunny Jo was originally approached at the beginning of the year by 23-year-old Jeanie Ditty, a soldier stationed at Fort Bragg in North Carolina.
Ditty told Jo that her 2-year-old daughter had recently died after choking on a banana, and that Ditty wanted photos made to remember her daughter with. Jo, who specializes in such tribute photos, agreed to create the photos for free to help Ditty heal from her loss.
The resulting Photoshopped photos show Ditty spending time at the cemetery with her daughter’s ghost.
![]()
![]()
![]()
Last week, Jo was floored when he found out that Ditty and her 32-year-old boyfriend had been arrested for charges that include first-degree murder and negligent child abuse. Police say the girl, Mary Grace, showed up at the hospital with bruises consistent with child abuse before dying within days.
“I regret that I’m attached to a situation that is so evil, and is so vile,” Jo tells Fox News. “She seemed like a grieving mother […] [I wanted] to give her some peace… I was fooled.”
Jo has been criticized on social media for the photos, but he says he doesn’t regret making them, as he now considers them a tribute to Mary Grace’s life.
“The reason I am open and talking is because this girl was killed brutally and she doesn’t have a voice,” Jo tells The Daily Mail. “This whole thing is a tribute for Macy Grace.”
Image credits: Photographs by Sunny Jo and used with permission
from PetaPixel http://petapixel.com/2016/03/31/photographer-shot-ghost-girl-photos-mom-arrested-murder/
Missing The Moment And Capturing It At The Same Time
![]()
I see this sight with increasing frequency: people holding up their phone in front of their face, recording a cool event or situation, like a concert or speech, watching the three-dimensional live event through a tiny screen.
It’s a conscious decision, choosing to record the moment rather than experiencing the purity and reality of that moment. It’s a choice photographers know something about.
It’s true, a photographer walks and balances on a thin line between the world we inhabit and the world we photograph. We’re usually not the active participants doing the things that people in our photographs are doing; and we’re not the passive audience watching them. It’s a unique space between the two worlds that I know well and one that I’m comfortable occupying.
To do my thing I don’t need to be in the actual moment but need to concentrate and be in the “photographic moment”. It’s often a lonely pursuit.
I was thinking about this because I recently watched Ben Stiller’s re-make of The Secret Life of Walter Mitty. There’s a scene that addresses the idea of putting the camera down to experience the actual moment–not through the viewfinder.
Ben Stiller’s character asks Sean Penn’s character — pro photographer Sean — who has been been waiting hours to capture a snow leopard that finally wanders into the frame–an obvious question…
“When are you gonna…take it?
To which Sean replies….
“Sometimes I don’t…if I like a moment…I don’t like to have the distraction of the camera…so I stay in it (the moment).”
Really? You didn’t take the shot?
It’s a great sentiment and I think non-photographers watching the movie can enjoy the scene and move on but for me, it took me right out of the movie.
It’s just not realistic and no photographer I know would ever not take the shot… but maybe that’s just cynical me. I can enjoy moments in my life when I’m not shooting, but when I’m with camera I much prefer capturing that moment rather than just seeing it. Every time.
I see photographers depicted in movies and often it’s just not realistic… a gang of press photographers awkwardly holding their cameras without fingers at their ready on the shutter release, and it takes me away from the story. I’ve seen it in big-budget films where there’s no excuse for the lack of attention to detail and realism.
(By the way, I don’t remember when in time the Walter Mitty film is purported to take place, but that’s a Nikon F3 Titanium — nice — and what looks like a more modern AF super-telephoto lens.)
In my photography career I have occasionally put my camera down for my own personal safety or out of respect for privacy. But if there is a great image in front of me, I may not always get it but I’ve always tried. In those situations I never put the camera down to enjoy the moment and not take the picture. In fact, if I see great pictures and don’t have a camera I almost look away. (Which is why I always have a camera with me).
I realize that photography is a big umbrella and I’m generalizing here but maybe there’s something about a photographers’ personality that keeps us on the line between living the life we capture and finding the perfect spot to view and record it. I’m basically shy and I thank my camera everyday for dragging my butt out into the world and bringing me to amazing places to witness magical moments I would never get to without it. No regrets; it’s who I am.
Though photographers don’t always participate in the life we shoot, our eyes are wide open, alive and on the lookout for beauty and meaning; something the people staring into their phones as they dangerously navigate the streets are missing. Good thing we were there to photograph it for them.
Where do you stand on this issue?
About the author: Steve Simon is a photographer based in New York City who’s obsessed with documentary photography and all things photographic. You can find more of his work and writing on his website and blog. This article was also published here.
from PetaPixel http://petapixel.com/2016/03/31/missing-moment-capturing-time/
An Exercise For You to Practice Depth of Field Without Going Outside
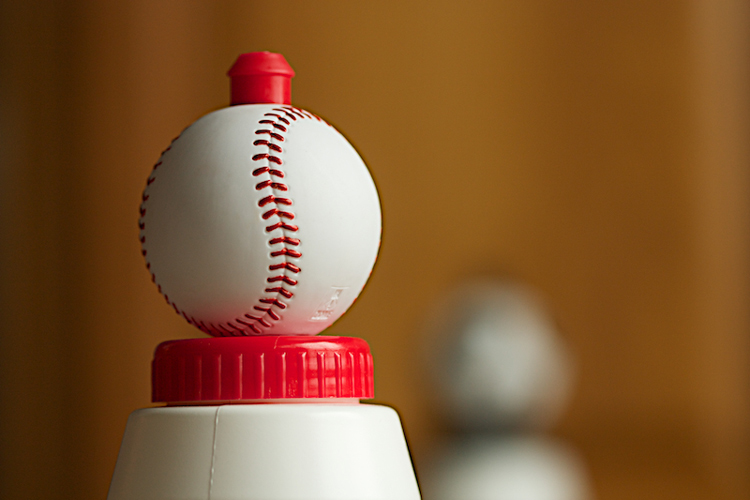
Many photographers, especially when starting out, have a difficult time understanding depth of field. I also hear quite often that photographers are waiting for nice weather to get out and shoot. So, here’s a fun exercise you can do at home, in any weather, that will help you understand the finer aspects of depth of field.
Depth of field is determined by which aperture you choose, what focal length you’re using, and the distance between the camera and the subject. In this example, we’ll explore depth of field using a 100mm lens.
To set up
Find between one and three small objects you can photograph. I found three sports water bottles with balls on the top to shoot. Next, you need some studio space. A patio door or very wide window works well.
Your next step is to set up your object, or objects, in front of the window and to place your camera in position. The object and camera should be parallel to the window.
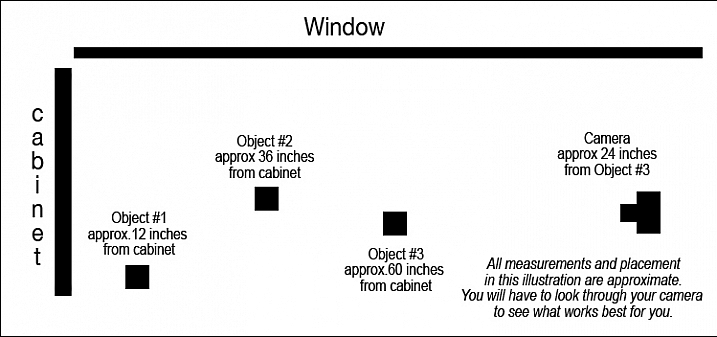
This is how I set up my camera and objects.
I put the first ball, the soccer ball, about 12 inches in front of the cabinet. Then I put the second ball, the baseball, about 24 inches in front of that. I put the third object, the basketball, 24 inches in front of the next object, and finally I set my camera about two feet in front of the last object.
You’ll need to play a little bit to see what works best for you. It will vary depending on the size of the object you are shooting, and the focal length you are using. You want to be able to focus on all three objects, and take a photo of them without moving your camera, so play for a minute. Focus on the first object and make sure you can see all three objects in the frame. Then focus on the second and make sure you can still see them all. Lastly, do it with the third one, too.
Set your camera on either aperture priority or manual exposure, and use the widest aperture you have. I chose f/2.8. Your lens might not have that aperture available, if so f/4 or f/4.5 will be just fine.
Shoot wide opened focusing on each object in turn
Now, without changing anything but your focus, take a photo of each of the three objects.
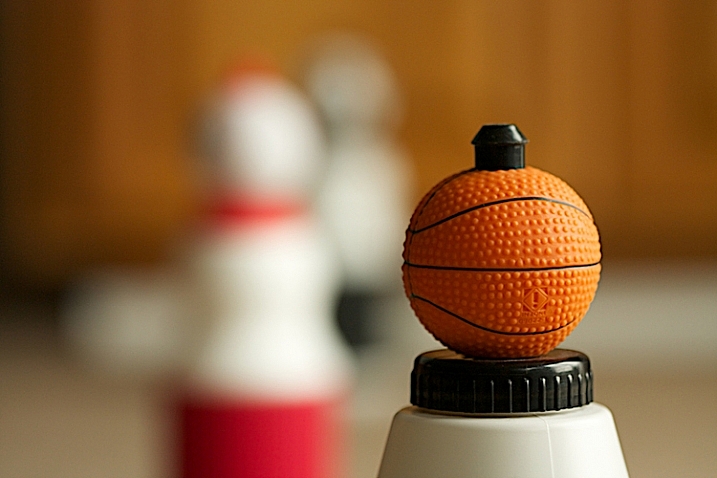
This photo was shot at f/2.8 while focused on the object closest to the camera, the basketball. Notice the narrow depth of field, in other words, how blurry the background is.
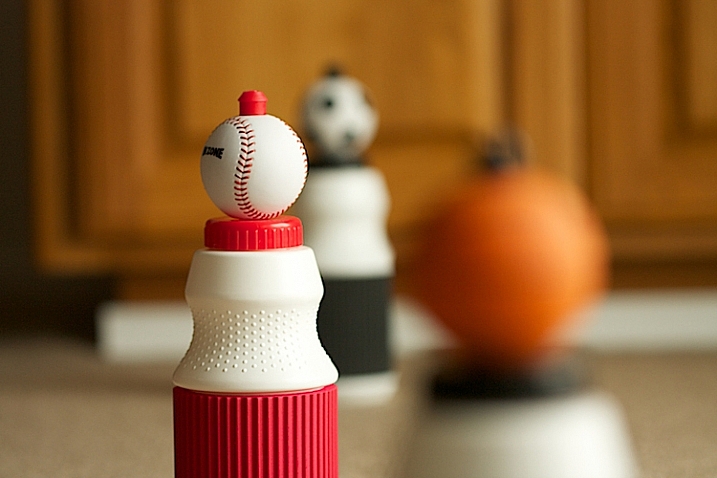
This was also shot at f/2.8, but this time, I focused on the middle object, the baseball. Notice that it is blurry in front and in back.
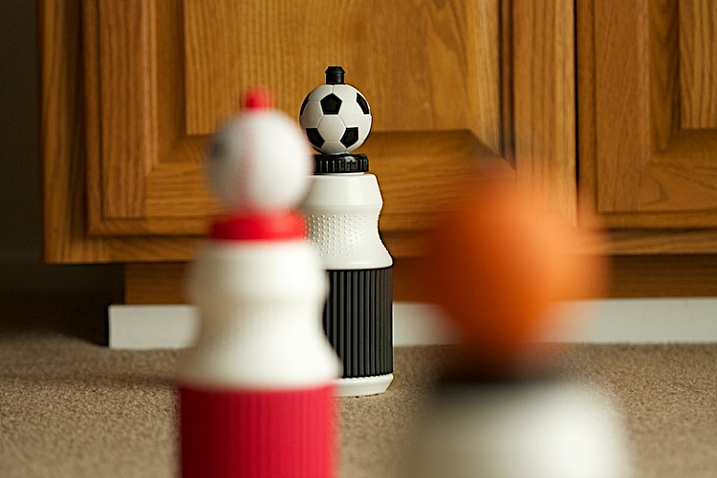
This photo was also shot at f/2.8, but I focused on the soccer ball. I did not change camera position nor did I change lenses. Notice the depth of field, but also notice the change in perspective. Can you see that more of the cabinet is in the photograph?
Next shoot with a small aperture
Now, let’s try something a little different. Instead of shooting at your widest f-stop, shoot at your smallest, which means a higher number, like f/32 or f/16.
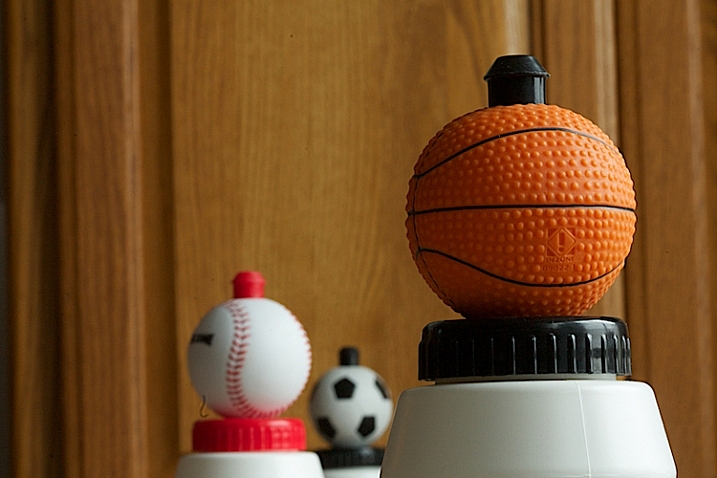
Here is the same situation. The camera hasn’t moved, but the aperture is now at f/32. The focus is on the basketball, but look how much is sharp.
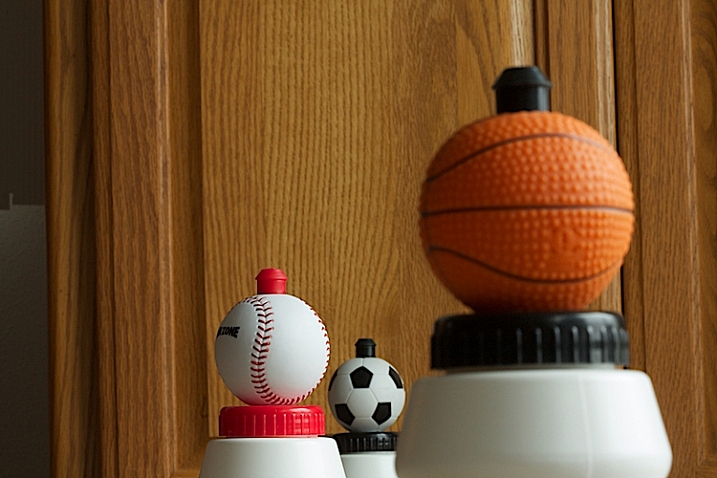
Look closely. The aperture is still at f/32, but the focus has changed to the baseball. Notice the basketball is more out of focus, but the soccer ball in the back looks pretty sharp.

Above is the third example. The focus is on the soccer ball.
You can practice each of these things with different f/stops to see the difference between f/4, f/8, f/11, f/16 and f/32. Each choice will change the depth of field.
Change the distance to the subject
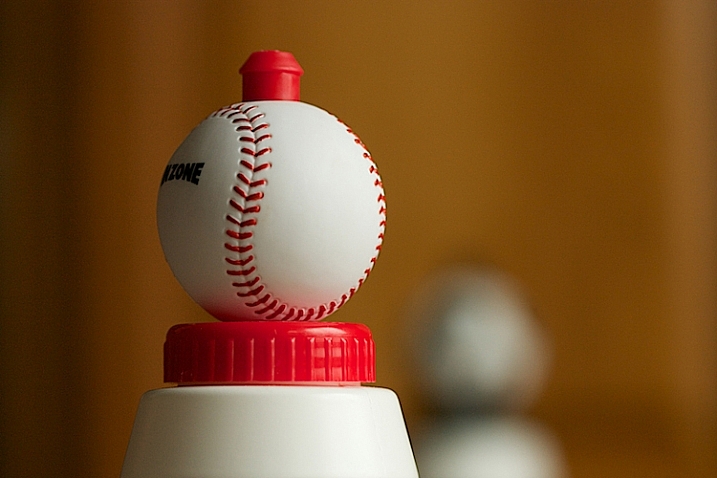
In the above photograph, I moved the camera closer to the baseball and shot at f/2.8. Practice isolating the elements and see what happens. Notice how the baseball really stands out, and look at the background. By isolating the baseball with a very narrow depth of field, the background becomes really out of focus. This tool is very helpful to clean up backgrounds.
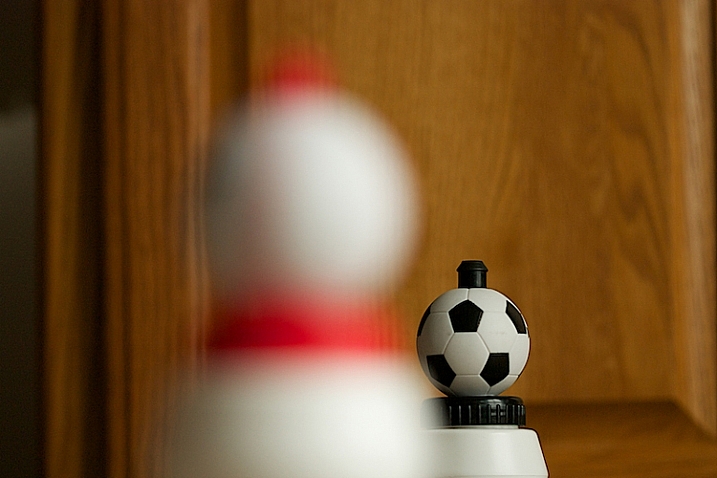
Then I changed my focus to the soccer ball. The aperture is still at f/2.8. What do you notice about the background?
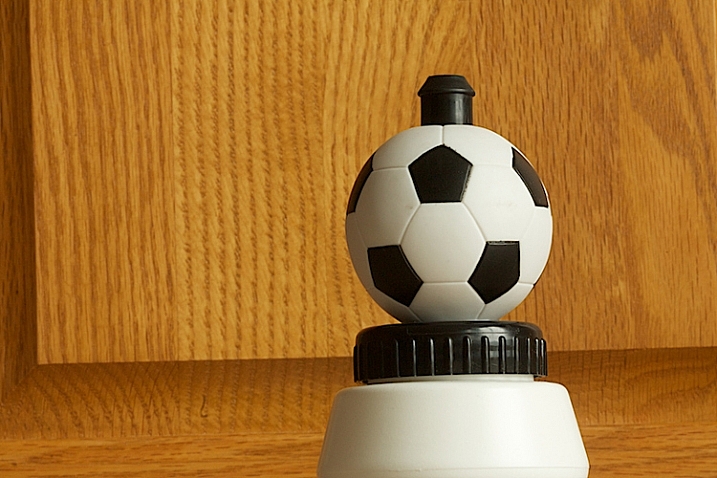
In the shot above the soccer ball is still in the original position, about a foot away from the cabinet. Notice how sharp the background is – this was shot at f/32.
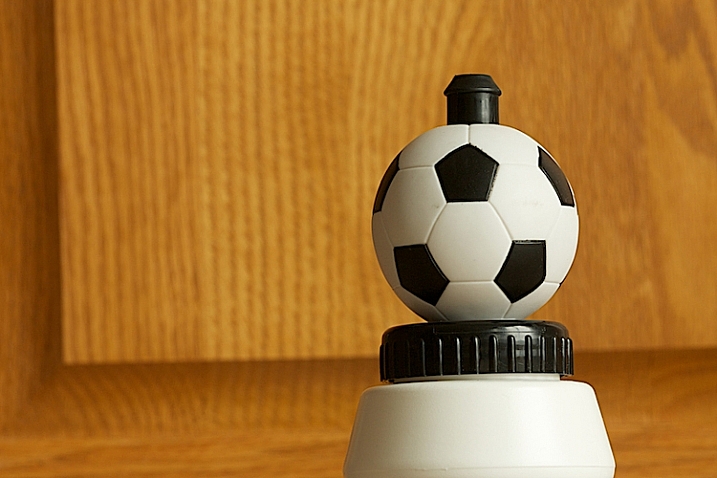
Now, notice how we start to lose detail in the cabinet behind. This image above was shot at f/11.
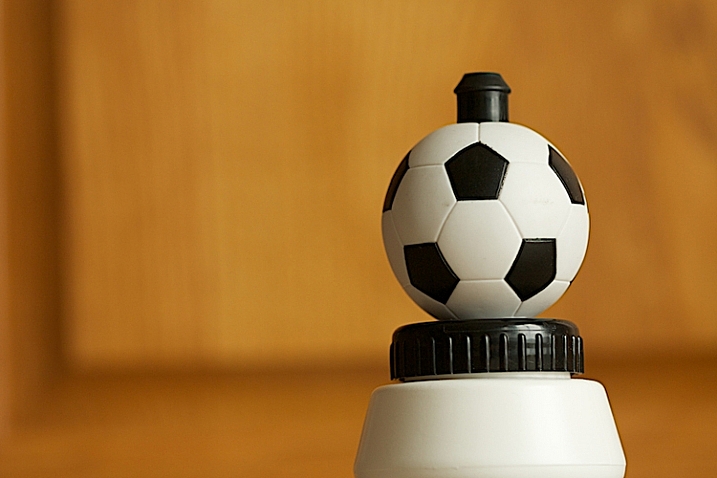
Finally, by shooting at f/2.8, and without moving the position of the soccer ball or the background, the background has become more out of focus and less distracting.
Take some times and practice this at home. So what you’ve learned here is a great way to practice depth of field at home–even on a rainy day! So take out your camera, find some small objects to shoot and start practicing.
Please share in the comments below how controlling the depth of field could impact how you shoot. What did you learn by doing this exercise?
The post An Exercise For You to Practice Depth of Field Without Going Outside by Vickie Lewis appeared first on Digital Photography School.
from Digital Photography School http://digital-photography-school.com/an-exercise-for-you-to-practice-depth-of-field-without-going-outside/
These Photos Show What a Peacock Feather Looks Like Up Close
![]()
Peacock feathers are designed to dazzle and attract a mate, but they’re equally amazing when viewed from up close. Canadian photographer Waldo Nell photographed one through a microscope, and the resulting photos look like colorful abstract art.
![]()
Nell shot the photos through an Olympus BX 53 microscope and a Canon Rebel T3i DSLR. Each image is composed of hundreds of photos that were stacked and blended to create single images with higher resolution and greater depth of field.
![]()
![]()
Nell works as a software engineer, but he’s also an “avid photographer interested in the extraordinary.”
![]()
![]()
![]()
![]()
![]()
You can find more of Nell’s work on Flickr and on 500px.
(via Waldo Nell via Colossal)
Image credits: Photographs by Waldo Nell and used with permission
from PetaPixel http://petapixel.com/2016/03/31/photos-show-peacock-feather-looks-like-close/